If you’re making EDM, Psytrance, or even if you make house, techno, or any other genre that is based around the kick and the bass – this tutorial is for you.
In this guide, I’ll walk you through the 5 easy but super effective steps to mix your kick and bass and get the perfect sound of the pros.
Step 1 – Pick The Correct Presets & Samples
I can’t emphasize this enough.
The most important thing when trying to mix your kick and bass is something you do before you start mixing.
And it’s picking sounds that you absolutely love from the beginning.
If you don’t use presets and samples that you love from the beginning, either you’ll spend a lot of time and end up with something that sounds o.k.
Or you’ll spend even more time and end up with something that you hate (which is what happens most of the times).
Keep in mind that each effect that you add decreases the quality of the sound a bit, So, it’s best to add as few effects as you can.
I use two primary sources for amazing samples and presets. One is free, and the other one does require payment, but it is way more professional.
The Free Source – Loopcloud

As many of you may know, Loopcloud is not an entirely free source of samples.
But, it has a fantastic section of free samples as well.
The free version of Loopcloud is recommended primarily for beginners, who just want a few great samples that can get them started.
But even if you’re an advanced producer, you can still find some great samples in the free version, and save some money while you’re at it.
Loopcloud Pros –
- You can easily filter your search results and find what you’re looking for.
- It has a super convenient desktop application that you can easily drag samples from, directly to your DAW.
- It lets you manipulate the samples inside the application.
- It lets you hear how multiple samples sound together in the application. (The free version only allows you to preview two samples together at a time.)
- Everything you download is royalty-free.
Loopcloud Cons –
- Its user interface is a bit messy, and therefore, it’s not easy for everyone to get used to it.
- The free version doesn’t have a large variety of samples as splice does.
- It doesn’t include presets.
https://www.loopcloud.com/cloud/
The Paid Source – Splice

Splice is basically a paid only software, but it’s absolutely worth the price.
Its subscription method is quite similar to Loopcloud’s method.
Every month you get a certain amount of credits that you can use to download samples and presets. (The amount the monthly credits that you get is determined by your subscription plan).
Usually, one sample equals one credit, and one preset equals 1-5 credits.

Splice Pros –
- It has a massive variety of samples and presets to pick from, so it’s guaranteed that you’ll always find the sample you’re looking for.
- Everything you buy on splice is automatically saved on your online library, and is yours forever, even if you cancel your subscription.
- The user interface is intuitive and user-friendly.
- You can easily filter your search results and find what you’re looking for.
- It has a super convenient desktop application that you can easily drag samples from, directly to your DAW.
- Everything you download is royalty-free.
Splice Cons –
- It is paid only.
- It doesn’t have manipulation options, as Loopcloud does.
Step 2 – Sidechain The Bass
First of all, for those of you who don’t know –
What Sidechain Compression Is
Sidechain Compression is a production technique that allows you to decrease the volume of one element when another element comes in.
This way, you can make space for various elements in your mix – usually, you sidechain your bass to make space for your kick.
Sidechain Compression works just like a regular compressor except for one thing.
Sidechain Compression uses an external signal to trigger the compression (instead of the threshold that a standard compressor uses).
Sidechain compression is especially popular via Hip Hop, Trap, Pop, Future Bass, and every genre that has a drum pattern that’s not sharp on the beat.
Since the gate sidechain method can only work with const beats, it’s great for genres like Progressive House, and Big Room where the kick is sharp on the beat, but it’s not good enough for genres where the kick pattern is complex.
How can sidechain help you?
You can use sidechain to decrease the volume of the bass every time that the kick comes in.
This way, you can make room for your kick to be punchy and “cut through” the mix.
Step 3 – Equalize Them Both
Equalization is the part where you add clarity and make everything sound clear.
Think of your mix as a box that contains three boxes – the low-end box, the mid-range box, and the high-end box.
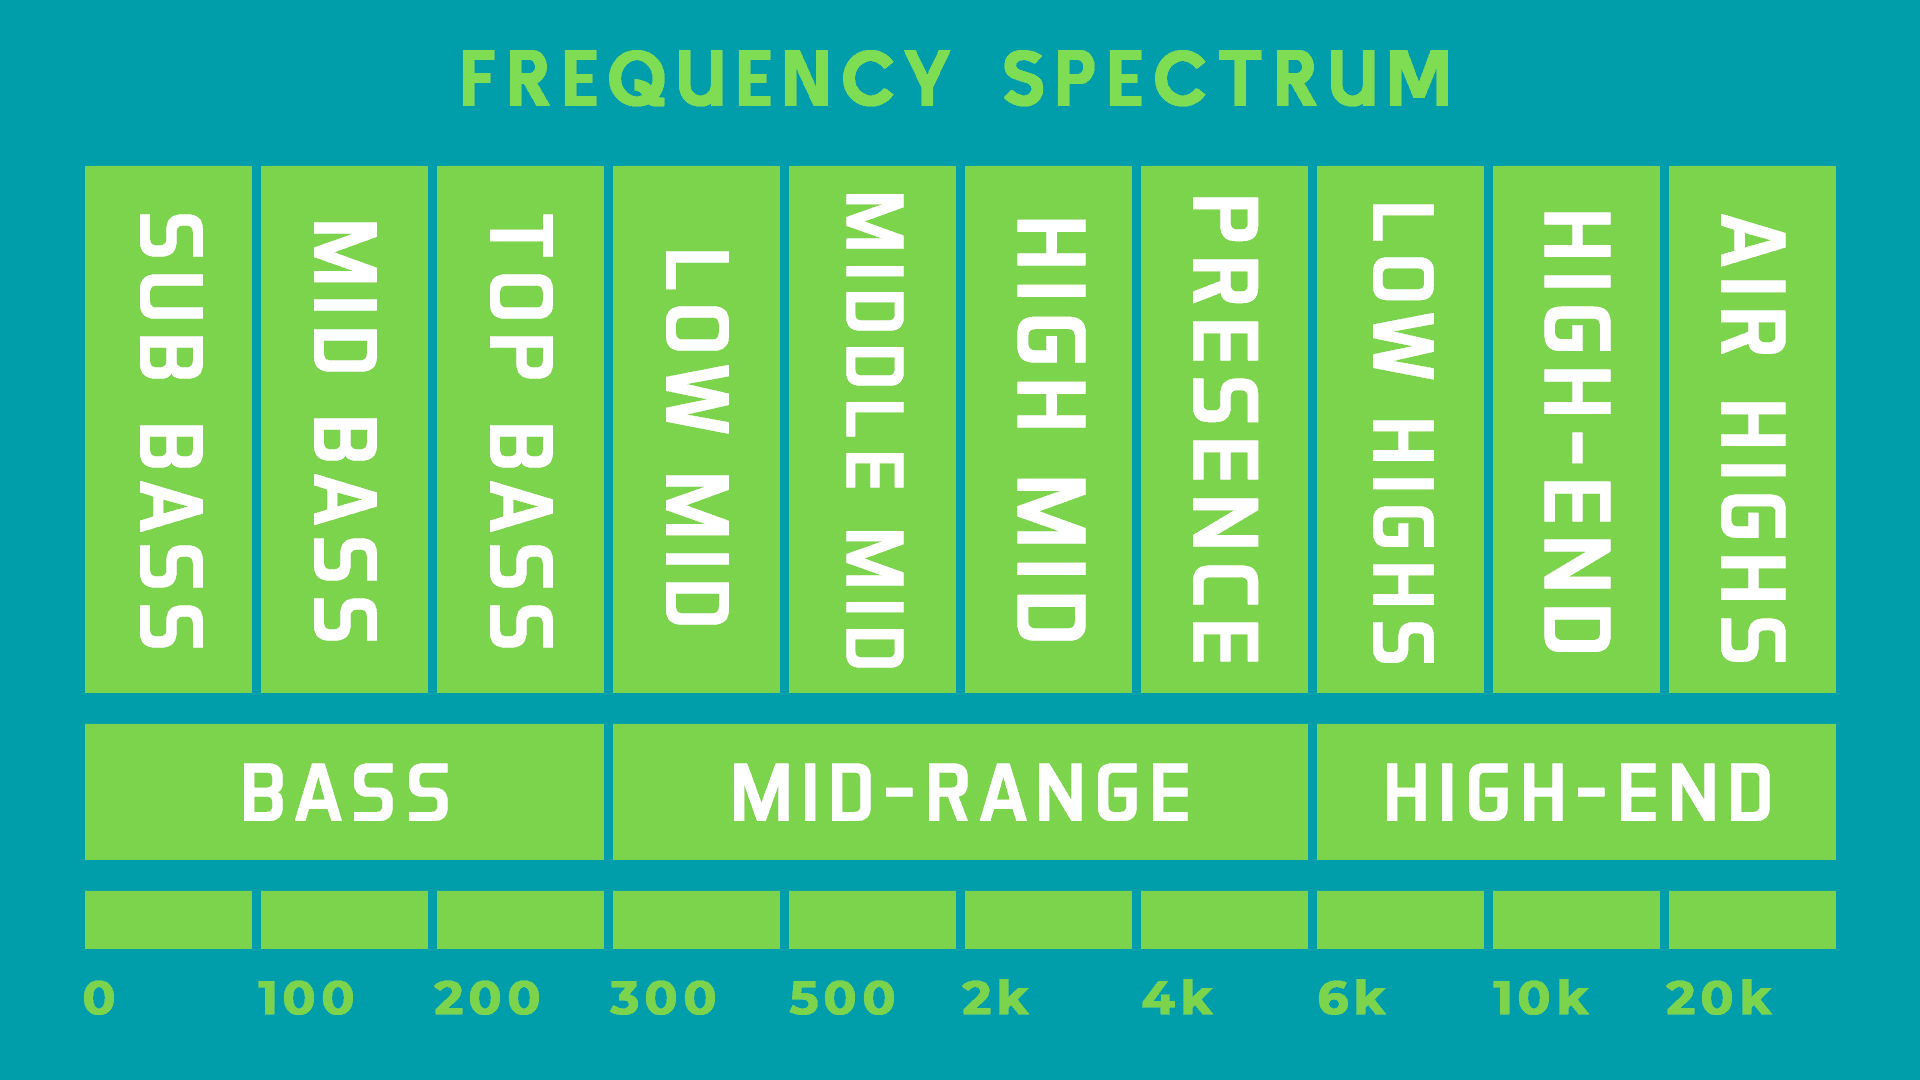
Since each box has limited space – you have to make sure that each element you add has enough space to get in.
In our case – we have to make sure that the kick and the bass have enough space – especially in the low-end box.
We can do that with three simple steps.
- Decide what the main element is – Every song that you’ll hear eventually has either the bass or the kick as the low-end ruler.
Both of these elements can do a great job as a ruler, but in the end, only one can do it.
The way you equalize will shift dramatically according to this decision. In EDM, the ruler is almost always the bass, so that’s a pretty easy decision for you to make. - Equalize the low-end – Since we have limited space only for the kick and the bass to fit in together, we have to make sure that each one of them “gives up” the dominance in at least one frequency range.
With that said, in order to make them give up the dominance, you have to decrease the volume of certain frequencies.
When equalizing the main element, try to find its weakest frequency areas. These areas will be the best areas for the other element to pop.
In EDM, the main element in the low-end box should definitely be the bass, so we have to decrease the volume of the low end of the kick.
But, be careful when you do that because reducing the low-end too much can make the kick thin.
A great habit of equalizing is tuning the kick to the song’s scale, and then decreasing the volume of the frequency that represents the scale of the song in the first/second octave (this depends on the scale).
Another thing I recommend is high passing low-end up to the frequency that represents the first octave of your scale note.
To find out what’s the frequency that represents the scale of your song, take a look at this chart.

3.Equalize the high-end – When making EDM, you want the kick to be punchy, and cut through the mix, but you also don’t want it to be too loud and create muddiness or take control over the bass.
The solution – boost the high-end of the kick.
Usually, a 3dB – 6dB to 9kHz – 15kHz will be perfect, but don’t be afraid to make even bigger/smaller boosts or not to boost at all.
As long as you know what and why you’re doing it, it’s completely fine.
Step 4 – Make Them Fat And Powerful
The three first steps were all about the basics.
This part is the part that will make your track powerful and fat, so it will one of those tracks that make everyone dance.
There are a couple of ways to make your kick and bass powerful. The two main ones are layering and using saturation&distortion.
My recommendation is to use them both, so you can get the best result possible, but in this guide, I’ll explain how to use saturation&distortion.
Saturate to your kick
There are a couple of steps you must take before you saturate your kick.
First, you have to ask yourself, what is the kick missing?
If it’s not powerful enough, and it’s missing some low-end energy, you should saturate the low-end (100Hz – 300Hz). But be cautious when doing this.
Most kicks that sound like they need a boost in the low-end, actually need a boost in the high-end and a cut in the low-end.
If the kick isn’t punchy enough, and you want to cut through the mix a bit more, you should saturate the presence and the high-end frequencies (6kHz – 15kHz).
Use soft clipping for power and loudness
Now that we got saturation out of the way, let’s talk a bit about distortion.
What is soft clipping?
Soft clipping is a type of distortion that brings all of the peaks of the kick down, so they don’t distort the ceiling.
This effect makes the kick more compressed, and a whole lot more powerful.
By using soft clipping, you can easily increase the loudness of your kicks, and make it more powerful.
How to use soft clipping
For this tutorial, I’ll be using Cytomic’s “The Glue” plugin.
As you can see, it seems like just another standard compressor. But it also has an amazing soft clipping feature.
To enable its soft clipping, all you need to do is to press the “PEAKCLIP IN” button.
Then you’ll need to raise the makeup gain until the top circle becomes red. Then tweak it until you like it.
It’s also really recommended to try and compress the part that’s after the punch in the kick a little bit.
Just raise the threshold until you see a 3dB-5dB compression, and then increase the attack until you hear that all of the punchiness of the kick comes through.
Saturate your bass –
Saturating and distorting your bass can make it full and powerful.
But, just as the kick, before you saturate, you have to answer two critical questions. Is your bass the ruler of the low-end? And what is it missing?
If your bass is more crucial compared to your kick, you better saturate its low-end heavily.
If it isn’t, you probably should focus on saturating the mid-range area instead of the low-end.
If you want to massively improve your skills of using saturation check out my guide – What Is Saturation And How To Use It!
Step 5 – Add Your Special Taste.
This part totally depends on you and your own sound.
In the end, you should be the person that likes your songs the most.
I assure you if you love your songs, there will be an audience that will love them as well.
That’s why you should always add some of your favorite elements to your songs, and therefore, you should also add your special touch to your kick and bass.
An excellent example of a unique taste added to a bass is the bass in the drop of brooks’ song “Boomerang.”
In this song, he added dubstep samples that he aligned and pitched, so they match the bass in the drop. This way, he made the bass unique and interesting.
Watch 9:14-11:20 in the following video –
Another great example of a unique taste is Jonas Aden and Mesto’s track “Your Melody”.
They wrote the bass so, it goes in between the notes of the melody. That way, it creates a super powerful rhythm that drives the whole drop.
Watch 8:55 – 9:20 in the following video –
Conclusion
You can mix the kick and the bass in your mix, and make them sound fantastic in 5 easy steps.
- Step 1 – Pick the correct samples and presets.
- Step 2 – Sidechain the kick and the bass properly.
- Step 3 – Pick the low-end ruler and equalize them accordingly.
- Step 4 – Make them fat and powerful.
- Step 5 – Add your own unique taste.
If you go through all the steps correctly, you’ll be able to achieve professional, clean, and powerful kick&bass.