You may ask yourself – “Is mono-compatibility still important?” since most listeners, today have wireless earphones/quality stereo speakers.
However, as you already know, great music gets played through all kinds of speakers and places.
And even though stereophonic speakers/headphones have become way more popular these days, there are still many monophonic speakers that your song can get played through.
Clubs, restaurants, and bars have many speakers directed in too many different positions and angles, so they can’t define what speakers are left and right.
So, they play everything in mono to avoid phase cancellation issues. (which I’ll talk about later in this article).
Plus, most cell phones today still use monophonic speakers.
And that’s a massive chunk of your audience that you’ll not want to lose.
Therefore, it’s still incredibly important to make sure that your tracks are mono-compatible.
In this article, I’m going to explain everything you need to know to achieve mono-compatibility and tell you really helpful tips that I’ve gathered throughout my life as a music producer & mixing engineer.
For your convenience, here’s a table of contents of the article:
Tip #1: Understand The Difference Between Mono And Stereo
You may ask yourself – What does the difference between mono and stereo have to do with mono and stereo?
Well, in order to understand how mono compatibility works, and why it may be ruined, you have to understand what phase cancellation is.
To understand phase cancellation, you have to understand the difference stereophonic and monophonic sound.
The difference between mono and stereo is in the number of channels that the speakers use.
Mono tracks send the same signal to all channels. However, stereo tracks send one signal to the left speaker and a slightly different signal to the right speaker.
Let’s take a further look.
First, let’s understand the mono and stereo individually.
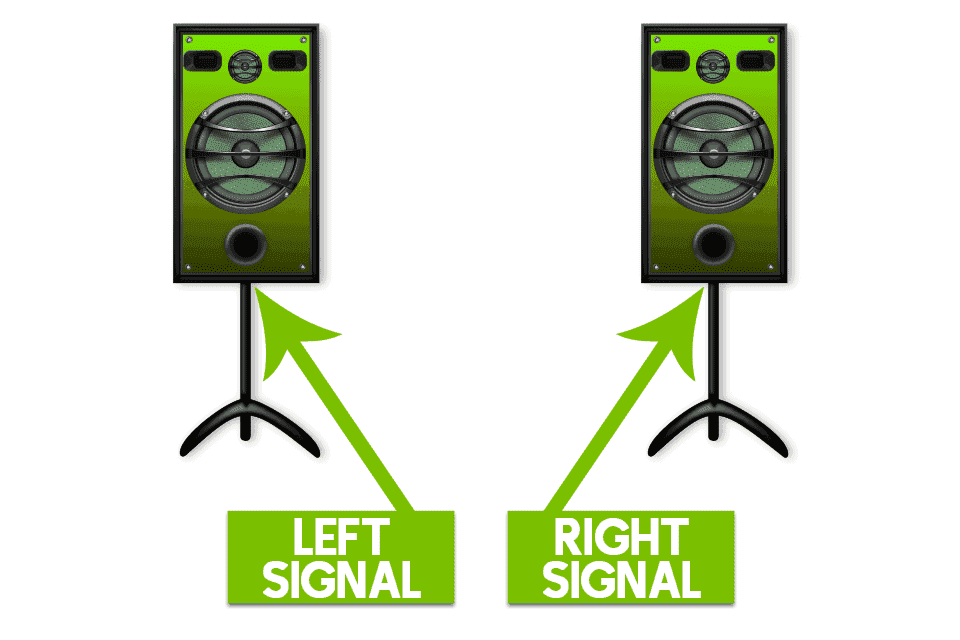
Mono
As written above, mono tracks send only one signal to both the left and right channels.

They can be reproduced through several speakers, but all speakers will still produce the same signal.
Have a look at this illustration to better understand it.

Stereo
Stereo channels send two signals, one for each speaker.

It uses two different channels, one for the left speaker and one for the right speaker.
Take a look at this illustration here to understand it better.
When a stereo track is converted to mono, both the left and right channels are summed into one mono channel.
Tip #2: Identify and Fix Phase Cancellation Issues
Have you ever encountered a situation where two mono elements sounded powerful and loud apart, but weak and quiet together?
If so, it’s probably because of a phase cancellation issue.
And it can happen between both two elements and the left & right channels of one element.
But, before we start handling phase cancellation, let’s understand what phase is.
What’s phase, and why is it important?
Phase is defined as how far along a waveform is in its current cycle.
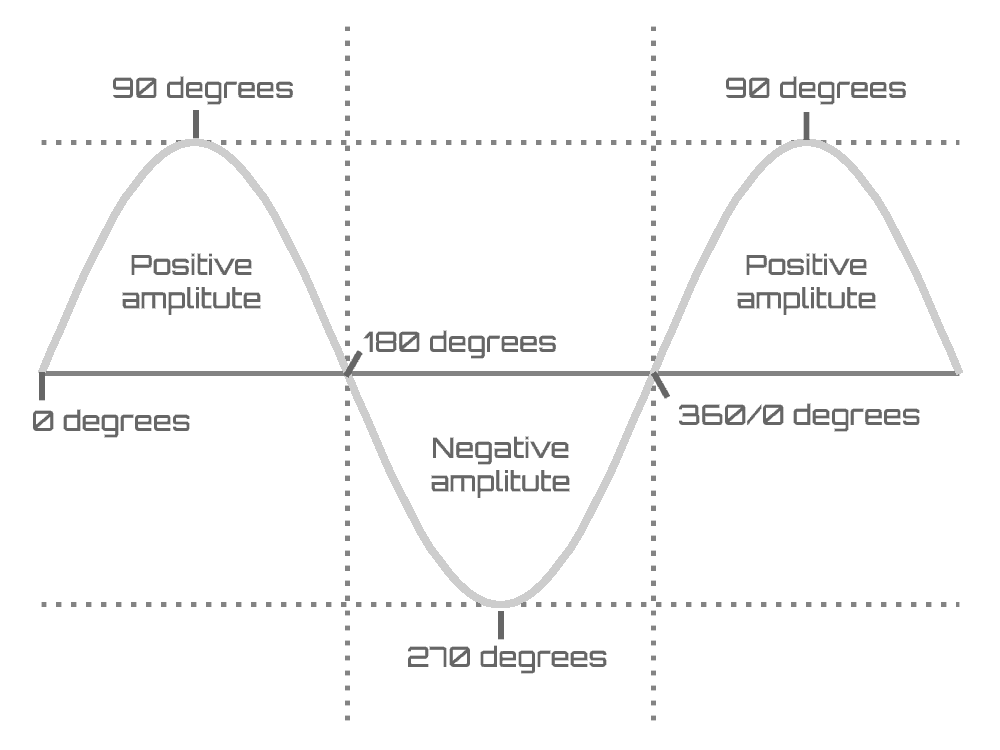
The starting point of a wave is 0 degrees, the peak of a wave is 90 degrees, the next neutral pressure point is 180 degrees, the peak low-pressure zone is 270 degrees, and the pressure rises to zero again at 360 degrees.
Source – “Teach Me Audio – Phase”
When stereo elements are converted to mono, their left and right channels’ phase at each point is summed into one main channel, that is what we hear in mono.
Therefore, phase plays a huge role when it comes to mono compatibility.
What’s phase cancellation issues?
Phase cancellation issues refer to situations where two waveforms that go in opposite directions get summed together and cancel each other out.
For example, if the phase of one waveform is 90 degrees and the other is 270 degrees, they’ll equal 360 (which is also 0) when summed together.
Therefore, they’ll cancel each other out completely.
Have a look at this illustration to understand it better –

As you can see, since the two waveforms go in opposite directions, they cancel each other out when they’re summed to mono.
How To Fix Phase Cancellation Issues
Sometimes, fixing phase issues can be as easy as inverting the phase of one element/one side of an element (one of the left/right channels).
If the phase cancellation is between two mono elements, you’d have to invert one of them, and if it’s between two channels of one stereo element, you’d have to invert one of its left/right channels.
But sometimes, you’d have to dive deeper and delay one element by a few milliseconds, and in extreme situations, you may even have to sidechain one of the sides by the other side, so they don’t cancel each other out.
A great plugin that I use all the time to identify and fix phase issues is InPhase by waves.
It lets you see a clear visual representation of the phase of the left and right channels, invert them, change their gain, apply sidechain, and delay each of them separately.
Tip #3: Place Each Element Appropriately In The Stereo Field
One way of making sure that your tracks will sound great on mono is to ensure that every element in your song has its appropriate place in the stereo field.
But, before we dive into how to place elements around the stereo field correctly, let’s understand what it is, and why it is relevant to mono-compatibility.
The Stereo Field

As you already know, every song consists of mono elements, left/right elements, and full stereo elements (which are elements that play both in the left and the right channels).
The stereo field is the space between the mono, left, and right elements.
How is the stereo field relevant?
You may be asking yourself – How is the stereo field related to mono-compatibility?
It’s relevant because the further you pan an element (left/right) in the stereo field, the less bold and strong it will become in the mono mix.
Therefore, you have to make sure that each one of your elements is appropriately placed in the stereo field.
How to place elements around the stereo field correctly?
To make your life easier, I’ve made the following illustration that tells you the best panning starting points for every element. (Center means mono).
But, to really make sure that you pan every element in your song in a way that’ll sound good in mono – you should pan them in mono.
This may sound a little weird to you since most people pan the elements in their song while listening to it in stereo.
However, it’s best for mono-compatibility since you’ll be able to hear how loud the element will be in mono.
So, my recommendation is to start with panning the elements as the illustration above, and then fine-tune according to your song while listening in mono.
Tip #4: Mono Your Low-End
The low-end frequencies aren’t directional, meaning you won’t be able to tell the difference between mono and stereo low-end.
A stereo low-end might cause a lot of phase issues and take a lot of space in the stereo field.
Therefore, you should just make sure that all of your low-end (0Hz – 200Hz) is completely mono.
You can easily do that with a multiband stereo imager such as iZotope’s Stereo Imager.

Tip #5: Use Mid/Side Processing
As you already know, each song has a mid-layer (which represents the monophonic information of it) and a side-layer (which stereophonic information of it).
Mid/Side processing allows us to process the mid-layer and the side-layer separately.
That way, we can control the way our track sounds in mono almost without affecting the way it sounds in stereo.
The most common form of mid/side processing is mid/side equalization, which allows us to boost/reduce frequencies of the mid or the side independently.

To affect the mono version of a song without ruining the stereo version’s balance, do the exact opposite of what you’re doing to the mid – to the sides.
For example, if you boost 2kHz of the mid by 5dB, reduce 2kHz of the sides by 5dB.
But, notice that if you reduce frequencies of the side, you also narrow the track.
And, over-using it can make your track sound weird, so be cautious when doing so.
Therefore, always check how your track sounds in both mono and stereo while using mid/side processing.
Take a look at this example of a hip hop beat pre and post mid/side processing.
Tip #6: Use Widening Layers Instead Of Wide Main Layers
If you have a specific element that you’d like to make wide and make sure that it’ll sound good in mono, there is a great trick that might work for you.
Make that element mono, and add stereophonic layers to it.
That way, you’ll have much more control over the mono element, and you’ll be able to make it sound good easily.
This technique is often used with vocals and EDM producers.
You’ll often see mixing engineers make the main lead vocals mono, and the background vocals panned.
And, you’ll really often see EDM producers make their main lead layer mono and the other layers stereo.
Tip #7: Don’t Use Stereo Widening That Isn’t Mono-Compatible
There are many ways to widen an element, and they’ll all sound good in stereo.
However, they’ll not always sound good in mono as well.
As written above, the more you push an element to the sides, the less present it’ll be in the mono mix.
Therefore, it’s important not to over widen elements in your song.
For example, the Haas effect, where you delay one of the left/right channels, is absolutely not mono-compatible since it usually causes a lot of phase issues.
However, you can use it in a mono-compatible way if you only use it on stereo widening layers.
Instead of using the Haas effect straight ahead on the main layer, duplicate it twice, pan the first one to the left and the second to the right, and delay each of them a bit differently (10ms – 40ms).
Then, decrease their volume until you hear the stereo widening, but can’t hear them.
Listening to reference tracks may really help you determine how wide an element should be.
There are two main mono-compatible ways of stereo widening elements.
The Easy Way
A great easy way to make sure that you’ll widen elements in a mono-compatible way is using a great stereo widening plugin such as NUGEN’s Stereoizer.
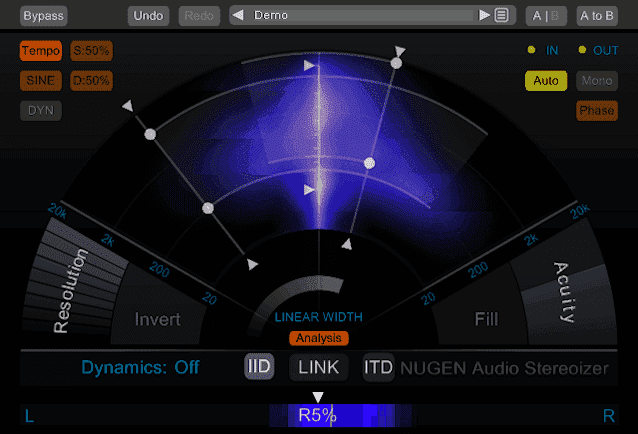
It uses two widening algorithms – ITD and IID (both highly mono-compatible and sound great).
It also lets you control the range of frequencies they widen, the effect’s density, and invert the phase. https://www.youtube.com/embed/Bj6mMq9IJDs
Check NUGEN Stereoizer out on Plugin Boutique’s website
The Manual Way (Mid/Side Recording)
The manual mono-compatible way of widening recorded elements is using a Mid/Side recording technique.
Mid/Side recording includes 5 steps –
- Use a directional microphone and a bidirectional microphone, place them closely together, and record the same thing at the same time.
- Duplicate the recording that uses the bidirectional layer.
- Pan the original channel to the left, and the duplicated channel to the right.
- Invert the phase/Reverse the polarity of the duplicated channel.
- Balance the volume of the two side layers compared to the mid-layer.
Using this way, you can widen your recorded elements a lot and keep your track completely mono-compatible.
When you convert the final result to mono, the side layers will disappear, and the mid-layer would just stay the same.
There’s a great video about this topic –