
Compression can sound really complicated. In fact, when I just started working on live stages this was the tool I’ve struggled with the most.
But, by following a few simple rules I’ll show you in this article, I managed to use it in a way that has improved my mixes’ balance, and made compression an invaluable tool.
For your convenience, here’s a table of everything I’ll show and explain in this article.
What Is Compression
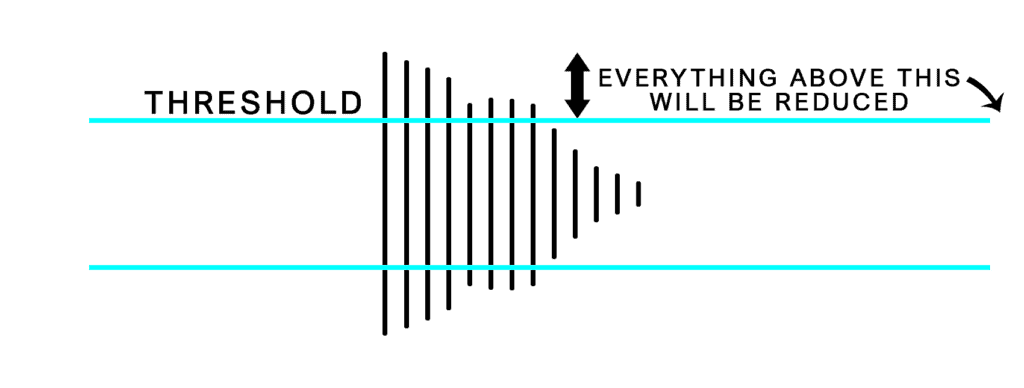
Compression is one of the most useful tools in audio production and mixing, and used well, it can literally transform a track. But what actually is it? Compression is simply the process of reducing the dynamic range of a piece of audio. This means that it’s taking the loudest bits of a sound, and turning them down, and then (usually) turning the entire sound up in volume too.
This means that the loudest parts will become closer in volume to the quietest parts, so if we imagine the sound wave, it’s literally being “compressed”. All of the information that was there will still be there, just taking up slightly less vertical space.

Compressors often have an output level, or make up gain parameter, which dictates the final output volume after compression has been applied. This is essentially just a master volume for the compressor, but this can enable you to make more from the quieter sounds within a piece of audio. This is because the dynamic range has been reduced, so turning up the master volume will mean comparatively, the quieter sounds are louder in volume.
Parameters On A Compressor
Compressors usually tend to feature similar controls – some more and some less. But they all essentially do the same thing, despite any parameter differences. Below we’ll look at some different compression parameters. One parameter you will almost always see on a compressor is the threshold.
Threshold
The threshold is the level at which a signal must reach before compression starts being applied. This means that the threshold allows you to choose at what point the compression starts happening. By default, this also means the threshold allows you to choose how much gain reduction happens to the audio.
Attack
The attack parameter determines how quickly after the threshold is met that the compressor will begin to work. So our attack time is essentially how fast the compressor reacts. This might not sound hugely important, but it can have a big effect on the resulting sound. For example, if a compressor has a very quick attack, it will start reducing the dynamic range as soon as the threshold is met.
This means for sounds like drums, the initial “impact”, or the attack/ transient, will be compressed. This will in turn result in there being less dynamic range within each drum hit, which means the drums will sound less punchy and lack impact – so the attack time can be really important.
In terms of vocals, the same principle stands. If you’re after more of a punchy, impactful vocal sound, then a slow attack is best.
Release
The release parameter is the exact opposite of the attack. It is how quickly the compressor stops working, once the threshold is no longer met. The release is probably the most difficult element of the compressor to understand, and that’s because it can be hard to hear. One of the best ways to practice listening to how the release phase of a compressor affects things is during sidechain compression, which I’ll go into later in this article.
Ratio
The ratio of a compressor is how strong the compression is. It corresponds to how much the audio is being flattened. A higher ratio will reduce all audio above the threshold to a very similar value, and compressors with very high ratios are essentially just limiters. This means they’ll prevent the audio level going above a certain threshold.
Compressor ratios are always displayed as x:1, where 3:1 would be an example of a low ratio, and 20:1 would be an example of a high ratio. Using a higher ratio can incur artefacts within the audio like distortion, which can sometimes be desirable.
Knee
The knee of a compressor refers to how the compressor transitions between non-compressed and compressed. It’s essentially another part of the attack, which dictates the attack curvature. A hard knee would mean the compressor kicks in immediately. A soft knee means the compressor would start working more gradually.
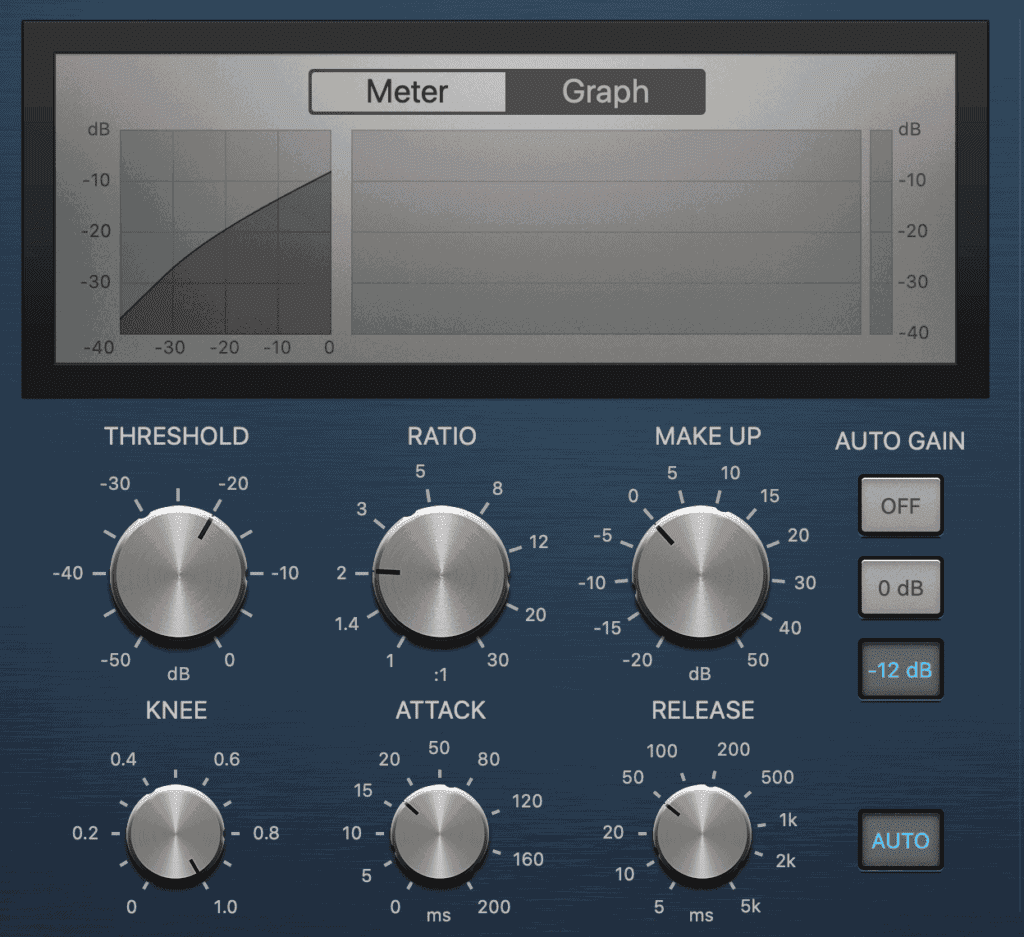
Make up Gain
As mentioned above, the last parameter is the output gain, or make up. This is usually found at the end of the compression controls, and sets the output level of the audio.
Step #1: Plan your compression process
When using compression, the most important thing to do to begin with is to work out what you want the compressor to do. This might sound obvious, but it’s very easy to apply compression without really thinking about it – and this is rarely beneficial.
Identifying whether you’re using a compressor to enhance and exaggerate drum transients, or whether you’re reducing the dynamic range of a vocal can give you a lot of information on what settings you’ll want to apply. It’s important not to over-compress or just add compression for the sake of it. This will reduce the dynamic range of your track as a whole, and probably won’t sound good.
When you’re compressing any instrument, but vocals in particular, here is a way to help you learn what to listen for, and apply compression intelligently.
Step #2: Turn off any auto gain/ make up gain
Lots of compression plugins will come with auto gain/ auto make up turned on. Logic and Ableton’s stock compressors both do this. The first stage should always be to turn the auto gain off. This is because in the next step we’re about to turn the threshold right down, and if you do that with the autogain on, it’ll become incredibly loud, and probably be quite painful.

Step #3: Turn the threshold right down
Next, we’re going to turn the threshold right down. You can go as far as you like with this, but I’d recommend really turning it down to begin with. The more we exaggerate the compressor settings, the more obvious the effects of the compressor will be. Make sure you’re taking off at least -10dB of gain here.
Step #4: Turn the ratio right up, and adjust output gain
After the threshold is dealt with, you’ll want to turn your ratio right up. Again, you can go as hard as you like here. Different compressors have different maximum ratios, but anything over 10:1 should give you some very audible compression. After this, adjust your output gain so that you can clearly hear the incoming signal.
Step #5: Set your attack and release times
So the purpose of the first three steps is to really over exaggerate any compression. Now we should clearly be able to hear exactly what the compressor is doing to the audio. Take a listen carefully, and then set your attack and release times to the quickest and slowest respectively.
Now, whilst listening to the audio, gradually increase your attack time until it reaches a point where it’s sounding best. Depending on what your aims are with the audio, this will be a different time. Listen through and trust your ears. Once you’ve settled on an attack time where the audio sounds great, do the same with the release time.
Step #6: Turn down your makeup gain and set your threshold appropriately
After you’ve set your attack and release time, your compressor should be sounding pretty good, but a bit over the top. Now that they’re set – we can fix the other parameters and see what we end up with.

Firstly, turn down the make up gain, as when we increase the threshold, the signal will become much louder. Now, we can start to turn up the threshold. I tend to aim for around a -3dB peak gain reduction on a compressor as a general rule. Any more, and the compression starts to become a bit too audible.
We never want to hear the compressor doing its work – we just want to hear the results of the compressor.
After you’re happy with the threshold, the make up gain can then be set as desired to make sure the track is an appropriate volume in the mix.
Types Of Compressors
There are 3 main types of compressors – VCA, Opto and FET. They all work slightly differently, and can give your sound different characteristics, but they’re all undertaking a very similar process.
VCA stands for voltage controlled amplifier, and these are probably the most common type of hardware compressor. They don’t colour the sound much – meaning they don’t add distortion or artefacts.
Opto Compressors work using photocells, and react to light. They are slower acting, but are typically very transparent, meaning its difficult to hear them working. They’re often favoured on acoustic instruments and vocals.
FET compressors use transistors, and they are very fast acting. They’re great for parallel compression, and anything that needs more force, like drums or guitars. An example of a FET compressor is the UA 1176.
Serial Compression
As different compressors have different characteristics, and sometimes we may want to do multiple things to certain bits of audio, using more than one compressor in serial can be a great way of sharing the load.
For example, with a vocal, a common approach is to use 2 compressors. The first of which will have a quick attack, and probably be a FET compressor. This compressor can be used to tame any transients, or loud sections in the audio. For some of the track, the compressor may not be engaged, but it’ll just bring down some of the louder sections.

The second compressor can then have a slower attack, and perhaps be an Opto. This can then work on the vocal lightly throughout the entire performance, as the big transients have already been dealt with. Sharing the load can prevent the compressors doing so much gain reduction that it becomes audible.
One important thing to remember here though, is that when compression is applied in serial, the ratios of each compressor multiply together, so it’s important not to use really high ratios, or the audio will be overcompressed.
Sidechain Compression
As I alluded to above, sidechain compression is the process of triggering a compressor on one channel of audio by using the signal of another channel. This is commonly used in electronic music to create a pumping effect, but it can also be used in mixing to move certain elements out of the way of each other.
For example, sidechaining a guitar to a vocal would duck the volume of the guitar each time the vocal entered, so it could always remain on top in the mix. Another approach could be to sidechain a vocal delay send to the dry vocal. This would duck the volume of the delayed vocal each time the main vocal re-entered.
The attack and release time control the “ducking” movement when used in sidechain compression. The attack is how quickly the volume ducks down, and the release controls the pumping action of how quickly the audio fades back in. This is a great place to listen to release times to get used to how the parameter works.
Tips For Compressing Live Sound
Compression in live sound has a few more limitations than in a studio. Particularly if the band or artist is using wedge monitors.
Vocal mics on a stage can often pick up a lot of bleed from other instruments. When a live vocal is compressed, it will make all of the bleed louder in the vocal signal, as the dynamic range is being reduced. This is an area to pay close attention to if you’re struggling to get enough vocal level – compression might not always be the answer.

It’s also worth considering feedback too. The more compression that is applied to the vocal microphone, the more likely you’ll be to get feedback through wedge monitors. There’s also the consideration that the vocalist might not like hearing themselves with a lot of compression on. It’s a very fine balance between making everyone happy in this situation.
One way around this, if there are spare channels on the mixing desk, is to create channel splits for the vocals that are being sent to the monitors. This allows you to compress the front of house vocal as much as is necessary, whilst the vocalist can hear their own, uncompressed vocals. This will also help to slightly reduce the risk of feedback in the wedge monitors.