In today’s article, we’re going to show you a few simple techniques you can use to edit your guitar parts. Not every recorded guitar take can be perfect, and you can waste a lot of time trying to capture parts with pinpoint accuracy. However, there are some handy tools and tricks that you can implement to bring your guitars to life and make them easier to mix.
Some producers/engineers like to mic up their amplifiers to capture a take, while others may choose to plug their guitar straight into an interface to record directly onto their DAW. Either method is just fine, and you can apply the steps below regardless of how you choose to record your guitars.
Step #1: Quantize The Recording’s Timings

Rhythmic guitar parts such as backing chords, riffs, and arpeggios can be quantized so that the overall groove of your mix feels tighter. Tighter parts will help blend your guitars into the mix before you give them any sonic treatment.
I like to quantize my guitar parts using two very simple methods. Highlight your guitar part you’d like to edit and insert markers on all the transients (in Ableton the command for this is Ctrl+I).
Once all the markers have been inserted, select them all, right-click and then select the quantize option in your dropdown menu. You should have options for timing values (1/4ths,1/8ths,16ths, etc) as well as quantization amount (0-100%).
I generally use the 16ths option and only use about 10-15% quantization. However, these values will vary depending on your take and I encourage you to train your ear to quantize instead of referring to the grid. Too much quantizing can make your guitar parts sound very unnatural, and anything that needs heavy tweaking should probably be rerecorded.
You can also extract the groove of your rhythmic instruments in Ableton and apply them to your guitar parts. Simply right-click the part with the groove you want and select ‘Extract groove’. Drag your extracted groove from the groove pool window onto your guitar take and adjust the timing, amount, random, and velocity parameters to taste.
I find this technique super handy for finding a more organic groove in your rhythmic guitar party without having to really on a static grid.
Step #2: Mute Any Noises That Slipped Into The Recording

Sometimes while recording you might pick up bits of extra noise that could clutter your mix or arrangements. Thankfully it’s pretty easy to remove any excessive noise from your guitar takes, and it will make mixing much easier later on.
Solo each of your guitar takes and inspect them individually for noise. Unwanted noise could include mic bleed, amp noise, or any crack, blips, or hisses caused by moving cables or processing glitches. Highlight the noisy areas in your take and either delete or cut them out of the arrangement.
Sometimes you’ll find a noisy part that is too close to a useful transient to cut out. Instead of completely deleting this noisy part, simply create a volume fade automation over the area you want to be removed. Fading out redundant noise will make your take sound more organic than completely deleting unwanted areas of your take.
Step #3: Use A Custom Pitch Correction Plugin To Fix Inaccurate Notes.
Much like singing, certain guitar parts may need a few minor tweaks in pitch to keep all your harmonics in check. You can use a pitch correction plugin to shift pitchy guitar parts into their correct note position.
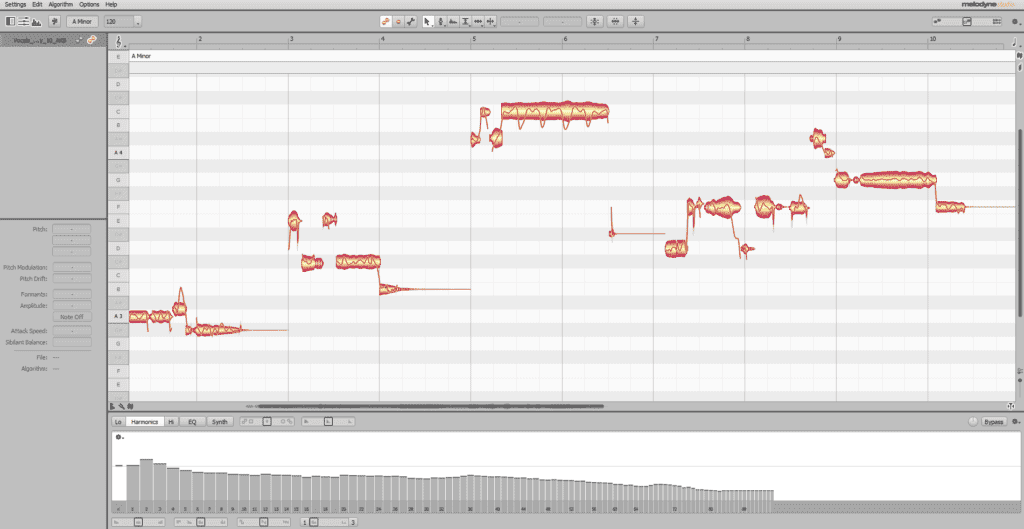
My favorite plugin for these types of adjustments is Melodyne. Melodyne is very simple and intuitive, so even beginner producers or engineers should find it easy to understand.
You’ll need to know the key of your song if you want to get the right pitch corrections. Set the key of the track using the dropdown menu in the toolbar. Your guitar take will be represented on a piano roll to show you how each note correlates with the other.
A quick way to tweak your take’s pitch is to select the entire take and use the pitch correction macro tool in the toolbar. There are parameters to center every note closer to perfect pitch, as well as a drift setting to adjust how far your note can deviate from perfect pitch.
You can also use various editing tools in Melodyne to do more precise pitch, timing, and velocity corrections for your guitar take. Using these tools can sometimes be quite time-consuming, but doing so will give you a much more natural sounding take than any shortcuts can provide.
Step #4: EQ The Guitar According To The Mix

Every instrument or element in your mix has some sweet spots in their frequency spectrums that you can enhance to give them some clarity. You can also remove any harsh or muddy frequencies for the same purpose. Here are some general guitar EQ guidelines:
Acoustic Guitars
- Cut out all redundant low-end frequencies below 120 Hz.
- Add one or two notches in between 100 – 500 Hz to enhance the body of the guitar.
- Scoop out any peaks in this same area if the guitar is too boomy.
- Add a notch around 1 kHz to increase the mid-to-high-end resonance of your parts (this is particularly useful for strummed chords.)
- Place a notch at around 5 kHz to bring out the color of your strings, or scoop any peaks in this area to reduce any high-end harshness.
Electric Guitars
- Roll-off any frequencies below 120 Hz
- Add some slight notches around 250hz if your guitar needs some extra weight in the low-end. Make sure that your guitar isn’t clashing with your bass in this area.
- Boosting around 1.5 kHz will bring out some mid-range color in your guitar, and will enhance any sort of distortion you might have used from pedals, amps, or plugins.
- You can also boost areas between 3 – 5 kHz to enhance the attack on your guitar parts, however too much boosting here may conflict with vocals, synths, or percussion parts.
- Try boosting some areas around 8 kHz to bring out some clarity and presence to your strings. You can also cut out anything above 10 kHz to reduce the harshness of your take.
Step #5: Use Compression To Balance The Recording

Much like compression, EQ is a reliable go-to for most engineers when trying to add some dynamics and life to guitar parts. Compression will also help to blend or glue your elements into place for a smoother overall mix.
Every DAW should have a stock compressor. It’s highly encouraged to learn how to use this tool correctly as it can either seriously evolve or stunt your mix depending on how you use it. Below are some basic guidelines for using compression on guitar parts:
- Ratio – This control determines how much compression is placed on your signal. I try not to exceed a ratio of 2:1 with guitars, as anything above this can make your guitars sound overly crunchy and muffled.
- Threshold – Threshold sets the volume level of your signal at which the compression is engaged. You’ll have to set the threshold depending on the volume level of your guitar part. Loud parts need a low threshold to reduce their harshness, while quieter parts need a higher threshold so that the compression boosts their output level.
- Attack – The attack parameter lets you set how quickly it occurs once the original signal is played. Strummed guitar parts usually need a slower attack to give them some added sustain. Quicker parts such as picked hooks or solos require a faster attack time, as this will make them sound punchier and more dynamic.
- Release – Release determines long the compression stays active once it has been engaged. A slower release time will create a longer compression and is great for chords or legato-style parts. Faster parts like solos usually need a quick release time to keep up with each note.
If you find yourself wanting more information on compression fundamentals, check out our article on How To Use Compression. This a really handy outline that will help you grasp the necessary basics of this vital tool.
Step #6: Add Special Effects And Flavor (Reverb, Delay, Saturation, Distortion, etc..)

The steps listed above are considered to be some of the fundamentals of editing your guitar parts. Once you’ve laid out the editing groundwork using these steps you should have a set of clear and cohesive guitar parts that blend quite naturally into your mix.
You can now add some extra character and color to these parts using a variety of effects. Pitch, timing, EQ, and compression are all clinical tools to make sure that help to bring the fundamentals of your mix together fluidly. The effects listed below can be used subjectively, as everyone has their idea of what they want their guitars to sound like depending on genre, arrangement, and personal preference.
Distortion and Saturation are the most widely used tools for bringing out some color to your guitar parts. Distortion essentially overdrives your guitar signal without raising the volume and is excellent for adding some grit and aggression to your guitar parts. Saturation increases the harmonic content of your guitar parts and I prefer to use this over softer guitar parts to increase their sparkle.
Reverb is one of the most underrated effects when it comes to improving your guitar’s placement in your stereo image. I like to create a return track with reverb in that track that I can then send to multiple guitars or a guitar bus/group to help glue everything together.
You can use low reverb values to add some roomy textures to your guitars or push the parameters to give your takes some soaring spacious content. Much like compression, you’ll have to train your ear to make sure your reverb diffuses at the right time and doesn’t create excess muddiness in your mix.
Final Thoughts
Each of the steps listed above has stood the test of time when it comes to editing your guitar parts. If you get stuck with any of the steps provided, try to do some extra research online or with other engineers to improve your understanding of how to implement them
You don’t need a ton of expensive gear or a top-tier guitar to get usable guitar takes. Simply make use of the steps above and I can assure you that your takes should see some form of improvement. Learning each step fully takes time and practice, but you’ll get better with every try. Thanks for reading through our guide on how to edit your guitar recording like a pro. Until next time, happy mixing!


