The acoustic guitar is one of the most fundamental elements of any song that contains it, so it’s crucial to make sure that you equalize it correctly.
And, equalizing acoustic guitars can be challenging, especially when their bass is strong and unstable, or when they have harsh frequencies.
So, in order to make this process as easy as possible for you, I’ve written a guideline of five steps that are easy to follow, and that will always give you your desired result.
The five steps are –
- High-Pass The Unnecessary Low Frequencies
- Balance The Bass Frequencies
- Remove Resonating Frequencies
- Balance The Mid Frequencies
- Balance The High Frequencies
In this article, I’ll explain each one of these steps, so you know exactly what you should do according to your goals when equalizing an acoustic guitar.
I’m also going to review five critical common mistakes that you probably don’t know you’re making, and explain how to avoid them.
And, even though most of this article is going to be about what you do with existing recordings, I’m going to show how to nail the recording part as well, since it’s key to every great sounding guitar. So look it up at the end of the article.
Bonus: There is a free super helpful cheat-sheet for EQing an acoustic guitar at the end of the article.
First, Here Are Some Principles You Should Know
Before we dive into understanding all 5 steps, it’s essential to acknowledge these three simple but important principles.
Principle #1: Make Things Right From The Beginning
Before you start recording and mixing, take a minute to think about how you want the final version of the guitar to sound like, and plan things accordingly.
For example, if you want the guitar to be bright and clear, use a diaphragm condenser microphone, and get a bit further from the microphone (5-10 inches).
But, if you want a warm and close sound, use a dynamic microphone, get closer to the microphone (2-5 inches).
Since this topic is so important, I’ve written a whole section dedicated to helping you to get the best recording possible. Look it up at the end of the article.
Principle #2: Avoid The Solo Button
In the end, the most important thing is the context of the guitar with the song.
And even though the changes you make when on the guitar sound great on solo, it doesn’t necessarily mean that they will sound good in the mix. Therefore, try to avoid it as much as you can.
The only time you should listen to the guitar in solo is when you try to remove resonating frequencies.
Principle #3: Always Reduce/Cut Before You Boost
When you’re reducing/cutting frequencies, you’re reshaping the sound of the guitar.
After you remove frequencies that were too strong, you make room for the other frequencies to pop, and you may find out that you don’t need to boost anything at all.
Therefore, always cut and reduce until you get a balanced sound before you boost.
EQing – The Five Steps
In order to eq acoustic guitars correctly, we better get familiar with something called the “frequency spectrum”.
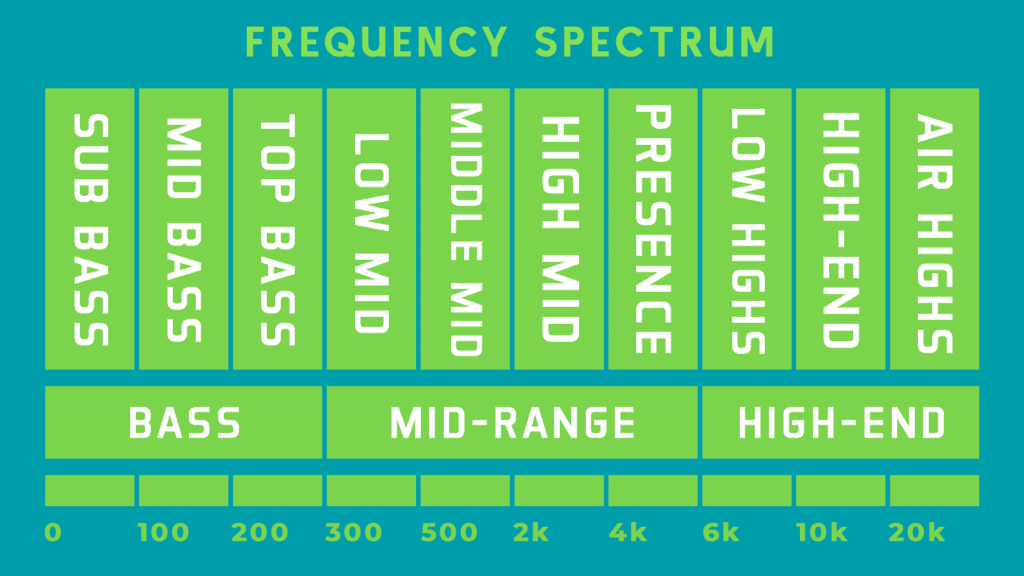
The human frequency spectrum describes the range of frequencies that the human ear can process.
It is divided into three parts.
It’s our job as music producers/mixing engineers to make sure that each part of the frequency spectrum is well balanced, and present in the mix.
Pick The Right Equalizer Plugin To Work With
Picking a plugin that you love and is easy to work with is essential to having a great mix.
Sure, it’s not the tool – it’s how you use it.
But, picking a plugin that is easy to work with, and that has all the features you need is most definitely going to help.
So, how can I pick the best plugin for me?
When picking an equalizer plugin, I recommend thinking primarily about –
What will you need to do with it?
This is the major thing I think about before picking a plugin since it tells me whether this plugin fits my goals or not.
For example, when trying to do super precise EQ work like removing resonating frequencies, I would rather pick a digital EQ plugin that has unlimited bands better than an analog one, that only has 5-6 bands.
Therefore, for this article, I’ll be using Fab-Filter’s Q3 plugin.
It’s an awesome digital equalizer that allows me to add unlimited bands, and do dynamic equalization (which is simple multiband compression).
Check Fab-Filter Q3 out on Plugin Boutique’s website.
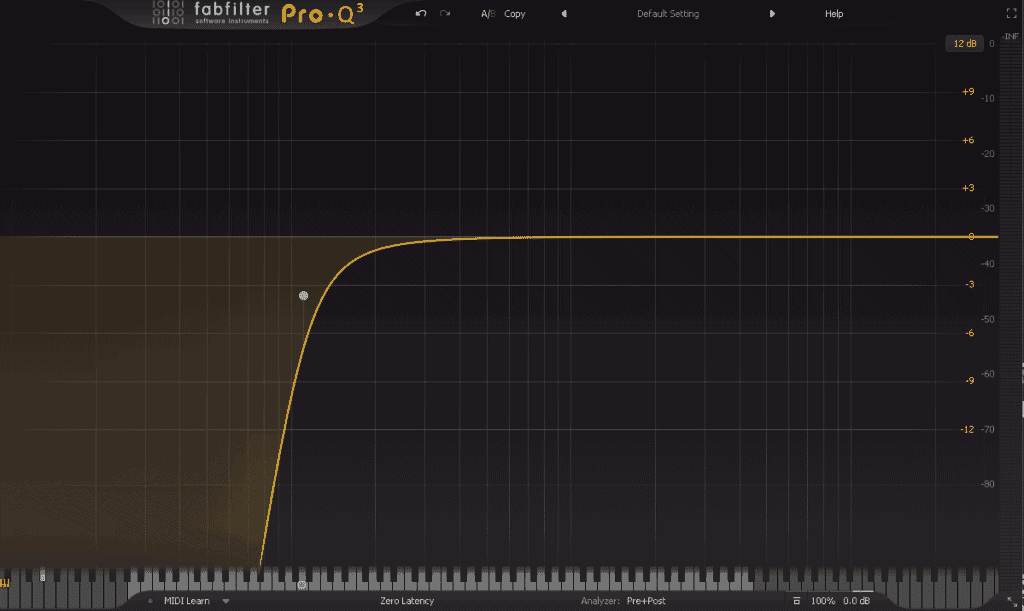
Step #1: High-Pass The Unnecessary Low Frequencies
*Do this step while listening in the context of the mix*
Every recorded element always has some unnecessary frequencies, and if you don’t remove them, they’ll ruin the performance of other plugins, and sabotage the mix altogether.
What are the unnecessary frequencies?
Unnecessary frequencies are frequencies that don’t improve the sound of the mix, or that don’t add anything to the element’s sound.
The unnecessary frequencies of an acoustic guitar usually sound boomy, or messy and unstable, and they’ll often be at 0Hz – 80Hz.
To remove them, add a high-pass filter, and raise it until you hear it starts thinning the sound. Then, lay it back a little bit.
I mostly start with a 0.8Q – 0.9Q and a 30dB octave roll, since it always gives me a great, balanced starting point. Then I fine-tune it according to the mix.
Have a listen to this example –
It’s important to acknowledge that this filter is not supposed to balance the bass all alone.
So, it’s perfectly fine if the bass is still too loud after using this filter. That’s what step #2 is all about.
Step #2: Balance The Bass Frequencies
*Do this step while listening in the context of the mix*

As written above, this step is all about balancing the remaining pieces of the bass and making sure that it doesn’t interrupt the mix.
Usually, I focus on the 80Hz – 300Hz range, since this is where the loudest bass frequencies of an acoustic guitar lay at.
To balance them, simply add a bell band, or a low shelf, and lower it until you hear it’s perfectly balanced.
3dB – 6dB of reduction and a wide Q would usually be about right.
I regularly start with about 3dB of reduction and a 0.8Q and fine-tune it from there.
Acoustic Guitar After Bass-Balancing –
It sounds great, but, as you can hear, some of its energy went missing.
What to do if you lose energy?
Sometimes, you may hear that the reduction took away too much of the body and energy of the guitar.
In these scenarios, I recommend trying three things.
1. Boost back some of the reduction –
If you hear that the guitar lost too much bass, just don’t reduce as much bass.
2. Use a multiband compressor –

A multiband compressor allows you to compress/expand a specific frequency range of an instrument.
Therefore, it’s perfect for this situation as it allows you to only reduce the bass when it’s too loud (when it goes over the threshold).
I usually aim for 2dB – 4dB of reduction, since it normally sounds both balanced, and dynamic enough, so it doesn’t take away the energy.
3. Boost around the key of the song –
Each note has a frequency that represents it.
For example, the key of our acoustic guitar is A, and the frequency that represents it in the second octave is 110.00Hz.

This frequency tends to obtain most of the energy of the low-end.
Therefore, a great thing to try in order to boost the energy of the guitar is to boost the frequency that represents the key of your song.
Here’s a table of notes and the frequencies that represent them –
| Note | Frequency (Hz) |
|---|---|
| G2 | 98.00 |
| G#2/Ab2 | 103.83 |
| A2 | 110.00 |
| A#2/Bb2 | 116.54 |
| B2 | 123.47 |
| C3 | 130.81 |
| C#3/Db3 | 138.59 |
| D3 | 146.83 |
| D#3/Eb3 | 155.56 |
| E3 | 164.81 |
| F3 | 174.61 |
| F#3/Gb3 | 185.00 |
| G3 | 196.00 |
I always aim to pick the octave of the note that’s between 100Hz – 200Hz.
It’s also important to use a wide Q to maintain the balance in the low-frequency range and keep everything sounding smooth and natural.
I ordinary start with a 2.5Q and a 3dB boost.
Then I fine-tune the boost amount, and finally, I refine the Q.
After completing this step, you should get a much clearer, balanced sound that could already work great in just about any mix.
However, in order to maximize the sound quality, and make sure that it would sound great on any device, you’d need to do the following steps as well.
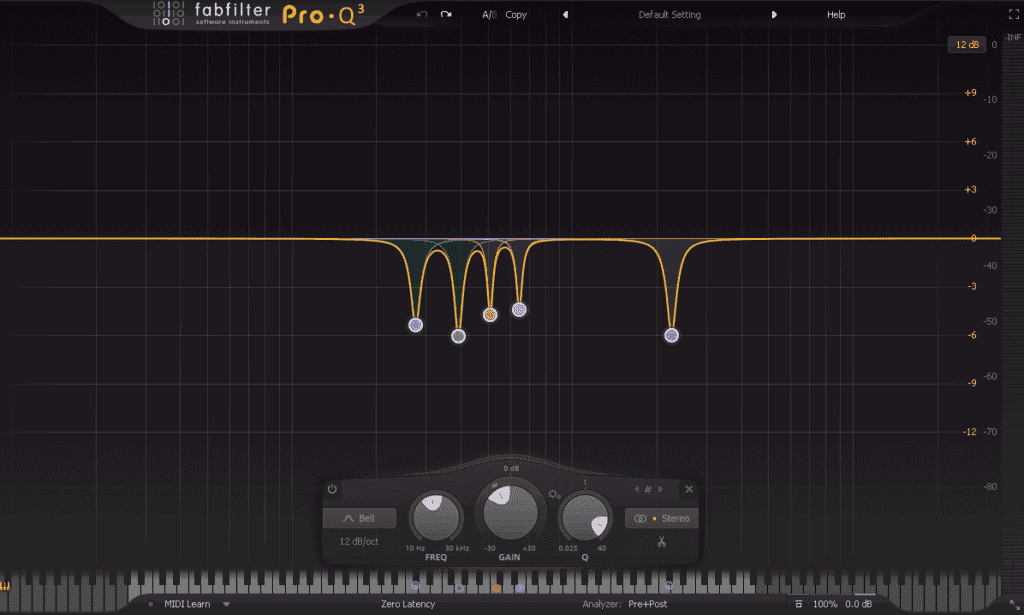
Step #3: Remove Resonating Frequencies
Every recording you’ll ever make will usually have some resonating frequencies. And they can easily ruin amazing records. So It’s important to treat and remove them correctly.
But, what are resonating frequencies?
Resonating frequencies are frequencies that are a lot louder than the rest of the frequencies that are near them in the spectrum.
They tend to be super narrow, and may really unbalance the sound.
So, how can I remove them?
To remove resonating frequencies, make a bell band with a really narrow Q (about 20), and a high gain (at least +10dB).
Then, go over the frequency spectrum and try to find the resonating frequencies that bother you.
It would help to take a moment and decide what this frequency sounds like.
If it sounds like a whistle – (200Hz-600Hz), if it sounds harsh and thin – (600Hz-4kHz), if it sounds like sharp air – (4kHz-8kHz).
If you’re still having a hard time finding the right frequencies to eq, I highly recommend that you start using these excellent ear training methods of “TrainYourEars”.
They will let you take a self suited training series that will make a massive change to your hearing and mixing skills.
Step #4: Balance The Mid Frequencies

The Low Mid-Range Frequencies (250Hz – 500Hz)
The low mid-range frequencies are responsible for the presence of the bass.
Boosting them will make the guitar sound thick, but it can also make it sound boomy.
Therefore, be cautious when boosting these.
The Middle Mid-Range Frequencies (500Hz – 2kHz)
Boosting these frequencies can give your guitar extra crunchiness. You should boost them if you feel like the guitar lack some power.
But notice that you should be extra careful when boosting these frequencies since the human ear is super sensitive to them.
So only boost them if you’re super sure that it improves the mix.
The Upper Mid-Range Frequencies (2kHz – 4kHz)
The human hearing is mainly centered at the upper midrange frequencies, so it’s crucial that you balance those correctly.
These frequencies are mostly responsible for the attack, but they can also add presence when they’re boosted.
Boosting these frequencies can make your guitar stand out a lot more, but if you boost them too much, they can also cause listening exhaustion.
Acoustic Guitar After Mid-Balancing –
Step #5: Balance The High Frequencies

The Presence Frequencies (4kHz – 8kHz)
These frequencies are responsible for the clarity of the guitar. These are also the frequencies that most home stereos center their treble control on.
If you want to make your guitar stand out a bit more, you should try and boost these frequencies.
Start by using a wide Q boost of about 2dB – 3dB and fine-tune it from there.
The Brilliance Frequencies (8kHz – 20kHz)
These frequencies are responsible for the sparkle and air sound of the guitar.
If you want to increase the spark of the guitar, boost around (12kHz-15kHz). Boosting these frequencies will make your guitar pop instantly.
However, if you boost them too much, they might make your guitar a bit harsh, so be cautious. Usually, a 2dB-4dB boost would be perfect..
Acoustic Guitar After High-Balancing –
5 Common Mistakes When EQing Acoustic Guitars
Mistake #1: Over High-Passing
This is a mistake that most people tend to make when trying to balance the bass of a guitar.
And, High-Passing too much can thin up the guitar, and really suck out its energy.
So, in order to make sure that you don’t fall victim to this problem, solo the guitar after you’ve determined your rough high-pass, and make sure that you only cut boomy/unnecessary frequencies.
Then, use a low-shelf/bell band to balance the rest of the bass.
Usually, I High-Pass everything from 0Hz up to 80Hz, and if I think the guitar needs it, I’ll also lower 120Hz-250Hz.
Mistake #2: Making Automatic Actions
By “automatic actions,” I mean the acts that you make even before you listen to the track.
Such as – high-passing everything up to 100hz. You have to remember that there is no straight pattern for a great mix.
Every track is a little different. Therefore, every track needs a different treatment. So, instead of pre, listen to each track carefully and make intentional choices.
Mistake #3: Ignoring The Context
Don’t forget that your final goal is to make your mix sound great, so your final choices must be made while hearing how your guitar interacts with other tracks in your mix.
So try to avoid the solo button while you’re equalizing.
It’s ok to use it when you need to be specific, but always check how the changes affect the mix.
Mistake #4: Avoiding Extreme Decisions
There is some advice out there that tells you to avoid extreme eq decisions so you keep everything sounding natural..
That would work great most of the time, but there are situations when you absolutely need to make those decisions. So, bottom line, the best thing you can do is to trust your ears.
Bonus tip: Use reference tracks and compare your guitar with an already equalized professional guitar. This way, you can make sure that you’re doing the right thing.
Mistake #5: Over Equalizing
Over equalizing can make your guitar sound electronic, weird, and unnatural.
Therefore, it’s important to be cautious when equalizing.
However, you should also avoid mistake number 2, and always trust your ears.
So, how can you know what’s over equalizing, and what’s a correct extreme decision?
As Written Above – Use Reference Tracks!
Reference tracks would tell you exactly how your guitar should sound like, and guide you into the right direction, so you can both avoid over equalizing, and make extreme decisions when needed.
Another great thing I like doing is setting the guitar’s tone how I want before I record them by setting the right mic placement and trying to find a great recording room.
How To Record Correctly So You EQ Easily
To achieve the balanced tone that you often hear in professional production, you’ll have to nail things right from the beginning.
This step is all about setting the basics right, so I really recommend you to read it.
How To Setup The Mics
Setting up the mics right is one of the most important things you need to do to get your recordings sound how you want them.
There are a couple of variables that determine the sound of the recording.
Recording Room Choicement

Picking the right recording room will save you a whole lot of time mixing and get you better results than you’ve ever imagined.
Whether you’re going to record in a professional recording room or your home studio, you have to find a place the treats your guitar well.
Things To Consider When Picking The Room –
- The Guitar’s Type – Each guitar has a room that compliments her the most.Try and experiment with different places until you find the best for your guitar.
- The Genre You’re Recording – Depending on the genre, you might want to change your recording room.When recording pop, for example, you might want to record in a very dry studio, so you get the super close, punchy feeling. But that might not be the case for rock or jazz songs. Generally, you should record in a room that’s quite dry, but not too dry (the dryer the place, the less reverberation it makes).
- Your Budget – If you have a limited budget, you might need to settle for your untreated bedroom as the recording room.But, it doesn’t necessarily mean that you can’t get great recordings. Remember that in the end, the most vital things are the guitar’s sound and the performer’s talent. Try to work with what you already have, and find the best room you can reach out to.
Placement In The Room
This is something lots of people forget to take care of, but it’s a significant key for a great recording.
Every room has its own “sweet spot”, and it would be best if you record in this exact spot.
There are two guidelines for positioning microphones:
- Don’t place the microphone in the exact center of the room – There is a buildup of standing waves (reflections that amplitude certain frequencies) that will sabotage your recording.
- Stay away from walls or reflective surfaces – There will be lots of reflections coming to your microphone.
- Don’t ever record near corners – The corners are the place where all the bass and muddiness tends to come to, so it’s best if you stay away from there.
The best spot to position your mic is usually slightly off the exact center of the room.
This way, you’re not interrupted by the standing waves, and you’re also not facing a bunch of reflections.
Distance From The Mic
The distance you keep from the microphone has a massive effect on the low frequencies of the guitar.
Basically, the further away you go from the microphone, the less boomy and muddy it will sound.
But don’t go too far away because if you do you, you might lose the power and the body of the guitar.
Usually, it’s excellent to keep about 4-6 inches away from the microphone, but it’s best to experiment with different ranges, and find what works best for you.
Height Of The Mic
The microphone height also determines the sound of the guitar.
There are two variables to consider here – high frequencies’ direction and bass response.
High Frequencies
Since high frequencies emit in a downwards cone, a microphone positioned below the guitar’s hole will sound brighter than a microphone placed above the hole.
Bass Response
Since most of the bass centers in the hole, a centered mic placement will increase the bass response dramatically, and cause boominess and muddyness.
Therefore, try to avoid that area at all costs.
Free Cheat Sheet
As promised here’s your free cheat sheet –