
The voice is one of the most unique and dynamic instruments. We can use it in a percussive nature to provide a rhythmic drive or sustain and modulate lengthy notes for a wide variety of melodic expressions.
Because of their diverse characteristics, there are no hard rules for getting a perfect mix on a vocal. Male vocals are mixed differently to female vocals, tenors are mixed differently to altos, rappers are mixed differently to soul singers.
However, there are some fundamental EQ techniques you can apply to ensure that whatever vocal you track comes out clear, crisp, and present.
There are a handful of things that I like to check when recording my vocal to ensure that my vocal takes are as strong and present as possible before applying any treatment. You can think of this checklist as a quick form of quality when recording vocals:
- Make sure that your vocalist has warmed up, and is familiar and comfortable with the vocal takes they are doing. This will help you get a strong, confident delivery from them.
- Check that there is minimal electronic noise coming from any cables or connections in your signal chain from your microphone to your DAW.
- Try to record your vocals in a quiet room that has very little resonance or slapback.
You can prop pillows and mattresses up and around your microphone or use a clothing cupboard if you don’t have access to a professional recording booth.
For this article, we’re using a live recording situation to reference for EQ, so this could be a band tracking together in a studio or room, or a live performance at a music venue. - Make sure that you are using the appropriate mic for vocal tracking. A simple Shure SM58 can do the trick, but it’s highly beneficial to use a good condenser mic, like the Rode NT-1.
When applying EQ to a vocal, I always consider how I want the vocal to sound in the context of the entire mix, not just on its own.
Even if you are using the same vocalist across a series of tracks, their vocal will probably have to have the EQ tweaked according to each song’s arrangements and compositional elements.
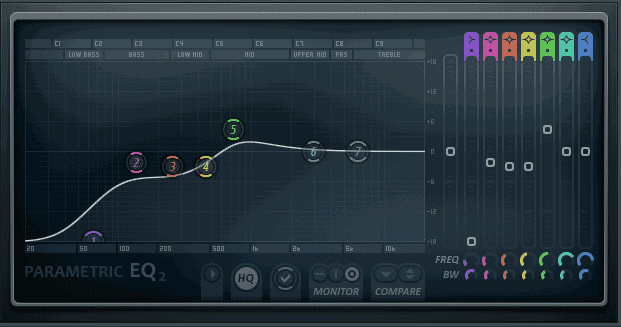
Step #1: Roll-Off All Sub-Frequencies

You’ll find this step in a lot of other EQ tutorials for various instruments, and with good reason. Human ears generally cannot hear any frequencies below 30 Hz.
However, you’ll still have to cut out these frequencies when EQing your vocal (or most other instruments). The sub-region of your mix can still carry room or electric noise and create an excessive rumble in your overall mix.
Place a high-pass filter on your EQ and roll off the frequencies up to about 60 Hz to get rid of these unwanted frequencies. Try not to make the slope of your high-pass too steep as it can cause your roll-off and vocal to sound somewhat unnatural.
Step #2: Balance The Low Frequencies (100Hz – 350Hz)

Balancing your bass frequencies is a slightly more intricate process than managing your sub frequencies. I sometimes find a few precious areas to notch up in this region, particularly for deep male baritone vocals.
If you are trying to enhance a predominantly low-end vocal you can bring out some of the vocal’s weight by setting notches around 250 -300 Hz.
Make sure to check that the vocal doesn’t clash with other low-end elements like your kick, or bass. Also, try to make sure that these notches have narrow peaks or Qs. Anything too wide will clutter up your mix.
For most vocals, I tend to scoop out and even cut out a lot of information in this region. There can be quite a lot of muddiness in many vocals in the low-mid area.
This mud can be caused by a vocalist being too close to the microphone (known as the proximity effect), or by reflections of the vocal bouncing around your room that create excess resonance.
You can actually improve the clarity of your vocal mix by removing harsh points in this region. Producers refer to this as ‘’cutting the mud’’. Look for aggressive peaks to gently scoop out between 300 and 500 Hz if your vocal is lacking in definition and punch.
Step #3: Balance The Mid Frequencies (350Hz – 900Hz)
The central frequency range of most vocals is responsible for the warmth and coloring of the vocals. You’ll find a generous amount of the foundational characteristics of male vocals in this area, and I like to apply my EQ quite delicately in these parts.
If your vocal is too muddy, search for areas between 350 – 800 Hz that may be coming through too strong. Scooping out certain points in this area can also remove the boxiness from your vocals.
I tend to remove larger sections in this region for backing vocals and vocal doubles to make my primary vocal sound much stronger and gain more focus.
In contrast, I find that bringing up certain areas within the same frequency region can add some body and depth to thin or tinny vocals. I find this works especially well with female vocals, as well as with rappers who may not be delivering every lyric with enough consistent velocity.
You can look for notches to palace between 500 and 900HZ to help enhance the diction and punchiness of these types of vocalists.
Your vocal will probably be competing with other mid-heavy instruments in your mix like synths or guitars, and I usually do some reductive EQ on these instruments before treating my vocal’s mid-range to avoid overexerting my vocal mix.
Step #4: Balance The High-Mid Frequencies (1kHz – 5kHz)

The high-mid region of your EQ is generally the busiest area of your entire track. Your vocal may have to compete with intricate guitars, synths, drums, and other elements in the mix.
I try to apply the EQ to my vocal here with the rest of the mix playing alongside so that I can get a proper sense of where I need to cut or scoop and to what degree. When applying EQ in this region I try to focus my ear on the presence of the vocal delivery in the mix.
Overly prominent frequencies in between 1- 5 kHz can make your vocal takes sound abrasive or harsh. If your vocalist doesn’t have a strong low-end, then too much presence here can make your vocal sound unpleasantly honky (this is especially prevalent in female vocals).
If I feel like the lyrics are getting lost in the rest of the track I try to apply narrow notches between 3-5 kHz. Again, any notches that are too wide in this region can cause your vocal to clash with other instruments later on in your mixing process.
Certain vocalists have a more nasal tone than a chest voice type tone. This type of delivery gives their vocal a sharper overall timbre. I try to pay special attention to the high-mids of these types of vocalists as this area is quite definitive to the character of their takes.
Step #5: Cut Out The High Frequencies (5kHz – 20kHz)
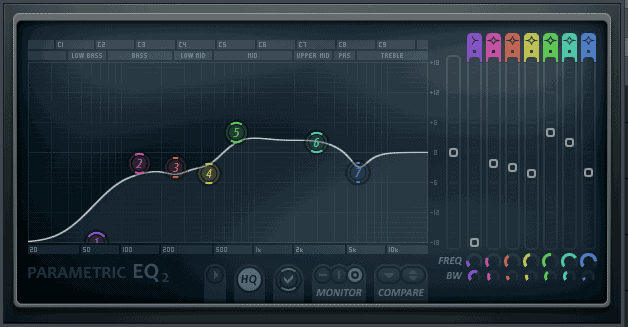
You can consider the top end of your vocal’s frequency response as the sparkle region. Most of the vocal’s primary information is carried lower than this area, but there are still a few sections of this area that you can tune to treat your vocal if need be.
The first thing that most producers like to do for this region of a vocal take is to listen out for any signs of any sibilance. Sibilance is the term that we use to describe any harshness caused by vocalists overexerting on lyrics with an S, T, or other hissing consonants.
You can reduce sibilance by scooping out any problem areas between 5 and 7 kHz. I tend to check this area with the vocal solo-ed to make sure that my vocal takes are free from this type of harshness.
Just like with sub-frequencies, you can choose to cut out the top end of your vocal with a low-pass filter. There is practically no vocal signal anywhere above 10 kHz, and you can place your filter here to save this region for your cymbals and other top-heavy mix elements.
Make sure that you don’t cut out too much below 10 kHz as this will begin to impede on the airiness or breath that sits on top of the vocal, and this can make your take sound unnatural or robotic.
Extra tips for enhancing your vocal.
Below are a few extra fundamental effects that you can use to further enhance or clean up your vocal.
While there is a wide range of vocal plugins and effects units available, I recommend getting to know the basic effects units below before taking any advanced vocal processing units:
- Compression – Compression is one of the most widely used tools in production. Using compression can give your vocal some added punch and dynamic without having to do any major volume adjustments.
You’ll also be able to improve the attack and sustain of your vocal delivery if your EQ isn’t strong enough. - Saturation – Saturators increase the presence of specific harmonics when placed on an element in your track. I like to use saturation to bring out any vocal overtones and add color after applying my EQ.
- Overdrive – This effect isn’t necessarily reserved solely for guitar players. YOu can place subtle amounts of reverb on vocals to add some grit texture, particularly around the mid-range.
- Reverb – Much like compression, reverb is a popular and highly efficient tool for creating dynamics within a vocal.
You can enhance the stereo image of your vocal by adding some reverb to it or glue a group of vocals together by placing them in a bus and sending them through some reverb. Too much can smother a vocal or mix, so use wisely.
Final Thoughts
The above-listed EQ techniques should give you a strong framework for applying basic EQ across a wide range of vocals.
As mentioned earlier, there are several variables to consider when making EQ decisions during the mixing process such as the type of singer or vocal you’re treating, as well as the recording environment that you are working within.
However, the steps that we’ve provided should be applicable across a wide scope of vocal recording situations. You’ll also be able to apply these guidelines to various types of vocalists from singers to rappers- male, female, or otherwise.
If you find yourself thirsty for more knowledge on the ins and outs of EQ, check out our article on 5 EQ Tips That Actually Work. There’s a healthy list of simple but powerful equalizer tips that you can use for most mixing and recording situations. Thanks for reading our article on how to EQ live vocals like a pro in 5 easy steps. Until next time. Happy Mixing.


![How To Mix Your Beats In 6 Steps! [With Examples]](https://wealthysound.com/wp-content/uploads/2020/11/How-To-Mix-Your-Beats-In-6-Easy-Steps-Thumbnail-768x504.png)