You can immediately tell the difference between a good mix and a great mix just by listening to the drums – specifically the kick drum. Today’s article focuses on how to kick drum EQ.
Kick drums are the often overlooked heartbeat of most modern compositions. Understanding how to treat and shape them properly will not only make your tracks sound tighter and cleaner, they’ll make your drums hit hard in all the right sweet spots.
Just like every other instrument, not all kick drums sound the same. In the same breath, certain types of kicks work better in specific genres than others. It’s highly beneficial to understand the different kicks available to you in sound production and how to shape them appropriately.
The 4 Types Of Kick Drums

Acoustic Kicks (Rock & Jazz & Indie)
As the name suggests, acoustic kick drums are generally captured by recording live drums in a studio or similar setting.
You’ll find these types of kick drums on almost every live recording up until the 1980s when drum machines were first introduced, and they’re still used very frequently in modern production for rock, jazz, and other live styles of music.
It’s easy to spot an acoustic kick by listening for the amount of presence in the skin on the drum during playback. Acoustic kicks tend to have a higher amount of slap and click than most other kick drum types and aren’t significantly boomy in the low to the mid-end range.
Long Bass Kicks (Techno & Big Room & Hardstyle)
You’ll find that these types of kicks are a focal point in many tracks. The kicks are usually arranged in a 4/4 variation and are primarily used to drive the rest of the song’s compositional arrangements.
A lot of techno songs feature a loud, thudding kick drum that is usually paired with an overdriven bassline and minimal top-end instrumentation. As such, the kick drum is more apparent in these tracks than in busier styles of music such as jazz, trance, or even hip hop.
These kicks also generally have longer tails or decay than live kicks, so shaping their transients to fit with the song’s timing and tempo will make for a tighter overall mix. A large portion of their quality sits in the low-mid range, and they don’t necessarily have a very present click or top end.
Transient Centered Kicks (Progressive House & Psy Trance)
Transient-centered kicks are the black sheep of the kick drum world. Even though these kicks aren’t anywhere near as boomy or weighty as other kicks, they can be equally effective and punchy when mixed and used correctly.
Transient-centered kicks carry most of their information in the top end of the kick drum (or the click).
The click is responsible for a lot of the attack on these drums, and the lack of sub to mid frequencies gives the kick a unique dynamic and character. These kicks are usually played in quick succession and have a very short tail and low sustain.
Trance tracks can come with a ton of layers and information, so having a smaller, tighter kick works to the advantage of the song. You’ll know when these kicks are in their sweet spot when they almost sound as if they have a whipping effect on the fundamental groove of the songs.
Short Bass Kicks (Trap & Hip Hop)
I generally find that trap and hip hop kick drums have a decent amount of grit, color, and body in the low to mid-range. These types of kicks are usually very full and have a well-rounded low and top-end.
A lot of boom-bap and trap is created using sampled kicks from live recordings of older music. These kicks are then further treated and enhanced to help them blend better with modern production elements.
Because these kicks have a lot of information in their low to mid-range, they can often clash with other instruments in this frequency range in your mix.
This conflict can cause your mix to sound muddy and can detract from the bounce or dynamic of your track’s groove. These instances happen a lot when producers layer kicks with an 808, which has an equally strong low end, but with a much longer tail.
Now let’s take a look at how we can EQ each one of these 4 types of kick drums correctly, and go over some necessary really helpful tips that will help you do that.
Step #1: Balance The Kick Drum’s Volume
More often than not, mixing issues can be solved by simply doing a few volume adjustments between instruments before any treatment or processing. This is referred to as gain staging and can save you precious time later in your mixing process. Solo the kick and check its peaking volume both in the master channel and in its respective channel.
As a rule of thumb I like to leave a bit of headroom between 0 dB and -6 dB with the kick never reaching beyond -3db. . Make sure that your kick isn’t taking up too much volume in this region for a more fluid mixing process. Every kick drum is different, so try to use your ear as much as possible when doing volume adjustments.
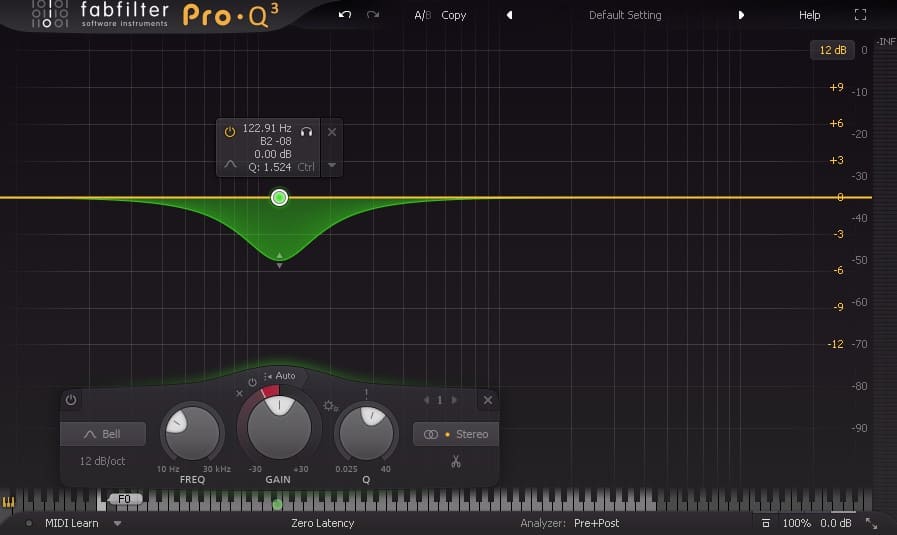
Step #2: Cut Unnecessary Frequencies (0Hz – 30Hz)

Our ears tend to cut out any subharmonic frequencies below around 30 Hz. However, you’ll still want to use a high pass filter to cut out any subharmonic content on your kicks below 30 Hz. This goes for other instruments as well (except for intentional bass and sub-bass instruments).
When you read your kick on your EQ’s visualizer you’ll seldom see any sort of response in this area, which makes it seem like using a pass is a redundant exercise.
However if this info compounds with other sub-elements in the mix it can detract from the groove, clutter up your low-end and give your mix a strange muddy, flatness that is trickier to remedy later on in your mixing stages.
Step #3: Balance The Low-End (30Hz – 150Hz)
How To Balance The Low-End Of Acoustic Kicks
There isn’t a lot of useful information around the sub-frequency end of these types of kicks. You’ll want to use a high pass filter to see how much of these frequencies you can cut out without affecting the weight of the kick drum. Acoustic kicks also tend to have most of their attack at around 90 – 150 Hz, so I recommend using a notch filter to search for the strongest pieces of information here to enhance your kick’s punchiness. You can also lightly scoop out any frequencies here if the kick hits too hard.
How To Balance The Low-End Of Long Bass Kicks
EQ-ing your low-end on these types of kicks will come down to the feel of the rest of your instruments in the track. Check around 60-120 Hz for any areas that might brighten up the attack of your kick. If the song is not too busy, you can let a lot of low ends pass through the kick, particularly if your basslines are simple and minimal.
However, if you’re looking for a tighter, punchier groove that fits with a busier composition, cut out some (but not all) of the low-end frequencies of these kicks up to around 60Hz. You’ll be able to use compression or a transient shaper to sculpt any excessive sub-end frequencies on your kicks for a better mix.
How To Balance The Low-End Of Short Bass Kicks
Just like the name suggests, you’re going to want to remove the majority of the information in this region so that it does not clash with any other sub-heavy instruments like 808’s or basslines.
However you are going to want to preserve the punch in this kick, so make sure you only cut out as many sub frequencies as you can without thinning out your kick, and notch up the sweet spots between 90 – 150 Hz where the kick hits hardest.
How To Balance The Low-End Of Transient Centered Kicks
These types of kicks generally need zero sub frequencies in their playback signal and as such, you can remove everything up to about 60 Hz for a lighter and tighter kick sound. Even though you’ll still want to enhance the attack of these kick drums, this is handled primarily in the top-end of the frequency response.
Try to attenuate any harshness between 80 -150 Hz to remove any overly bassy tones from your kick drums.
Removing these low-end frequencies makes it much easier to mix these kicks when played in quick successions, and will allow them to cut through complex parts of your arrangements.
Step #4: Balance The Low Mid (200Hz – 500Hz)

How To Balance The Low-Mid Acoustic Kicks
A lot of useful and detrimental information is present in this area of acoustic kick drums. A general rule of thumb with many engineers is to ‘’cut the mud’’. This term refers to removing any obtuse signal response in this area to give your a kick a more precise attack and to clean up any muddiness from your low-end.
Similarly, if your kick sounds a bit flat or thin, you can search for some sweet spots in this area to bring up a bit more body to your overall kick sound. There is a fair amount of other instrumentation in this region of your mix (from guitars and synths to basslines and vocals) so try not to make your kick too fat or gritty as it will clutter up the rest of your mix.
How To Balance The Low-Mid Of Long Bass Kicks
The most useful information for these kicks is held in this low-mid area. To make sure that you get a reliable sustain from these kicks, you’ll need to search this region for any areas that help to boost the harmonic content of the signal. I tend to find a few bits of extra color in these kicks’ tones at around 380 – 450 Hz.
Again, try not to boost anything in this area too much, or it will most likely land up conflicting with one of your other mid-heavy elements in the mix like guitars or vocals.
How To Balance The Low-Mid Short Bass Kicks
I find the low-mid regions of these kicks to be a make-or-break area. Improper attenuation can lead to your kick sounding dull and a bit weak. You can look around 200-250 Hz for some areas that might increase punchiness, and cut anywhere between 450 – 550 Hz if you need to remove some thickness.
How To Balance The Low-Mid Transient Centered Kicks
As these kicks aren’t meant to be the heaviest part of your mix, you’ll need to make sure that nothing in this area is even slightly abrasive. Cut out a lot of the ‘’mud’’ between 300-500 Hz if the kick sounds too fat, or do the opposite if the kick sounds like it needs a bit more definition. Most of these kick’s attack is centered in the high end, but you can add some punchiness at around 200-250 Hz if need be.
Step #5: Balance The Mid-Range & High End (1kHz – 20kHz)

How To Balance The Mid-Range & High End Of Acoustic Kicks
If recorded correctly these kicks shouldn’t need a lot of treatment in this area. You can apply a low pass filter to sweep out the top end at 20 kHz, as this will save you the slightest bit of clutter when mixing later on. However make sure that you don’t lose any attack when cutting out the high end, sometimes these kicks sound just fine without a low-pass filter. You can also notch up anything around 1- 1.2 kHz to increase the clicking sound of your kick.
How To Balance The Mid-Range & High End Of Long Bass Kicks
As with acoustic kicks, you can apply a low-pass filter to cut out any top-end frequencies to clean up your overall mix. I like to give these kicks a decent amount of attack as they drive a lot of the song. Add a notch at around 1’2 kHz and sweep around this area until you find your kick sounds like it’s punching more accurately.
How To Balance The Mid-Range & High End Of Short Bass Kicks
Short bass kicks should have a similar audio aesthetic to acoustic kicks, but I find that a lot of kicks in hip hop and trap have a grittier, more low-end sound. When mixing these kicks I tend to pull my low pass filter down to around 12 – 10 kHz to give it a slightly warmer sound and to remove any redundant brightness. If your kick needs to hit a bit harder you can apply a notch between 1-1-5 kHz and tune adjust accordingly. Try not to make the width of this notch too wide or it might land up overwhelming other rhythmic elements such as percussion or vocals.
How To Balance The Mid-Range & High End Of Transient Centered Kicks
You’ll want to pay a lot of attention to this area of these kicks as it’s where the primary characteristics of their timbre stand out. Place a notch at around 1 Khz and use solo mode to search for the kick’s ‘’click’’ without the rest of the signal playing. You can also pull out a lot of the top end above 15 kHz to help clean up this area for a stronger presence in your attack.
Final Thoughts
The above-listed guidelines should give you a basic foundation for mixing your kick drums. While they may take some time to practice and grasp completely, doing so will help you deal with most kick mixing situations in your future sessions.
These are not hard-pressed rules and I highly encourage you to experiment with different EQ settings and presets to see if you come with your own unique set of mixing techniques.
If you’d like to find out a bit more on mixing drums, check out my article on How To Make Your Drums Hit Harder In 5 Easy Steps. You’ll find some simple tricks here that you can use to add even more punch and dynamic to your drum sounds. Until next time, happy mixing.