You make a new fire beat, you’re proud of it, and you export it while being it’ll sound awesome on any device. But then, you listen to it on your phone/laptop speakers and all of a sudden the fire 808 you’ve created just disappears.
Sounds familiar? This is actually super common among all trap & hiphop producers. But, there are great easy ways to fix it, and I’ll show and explain all of them in this article.
To make your 808 stand out on small speakers you’ll need to boost it around 700Hz since it’s the most prominent frequency of 808s on small speakers. If this doesn’t work, you can also saturate the mid-range to add harmonic frequencies around 700Hz, and boost it’s attack to attract more focus to it.
Step #1: Equalize Your 808 For Small Speakers
Before we go ahead and eq the 808, let’s understand the 808’s most important areas in the frequency spectrum so we can know exactly what we should do in every situation.
First of all, we have to understand that most small speakers can’t output anything below 150Hz, and struggle with outputting 150Hz – 400Hz correctly.
Therefore, no matter how loud you’ll make the bass of the 808 it won’t improve how it sounds on small speakers. Only 250Hz and above can actually affect how your 808s sound on small speakers.
Let’s look at this organized table of the most important frequencies of 808 to understand what’s the effect of each frequency group over the 808 on small speakers.
| Frequency Group (Hz) | Small Speakers Sound |
|---|---|
| 0Hz – 100Hz | Can’t be heard |
| 100Hz – 250Hz | Can barely be heard |
| 250Hz – 350Hz | The low-end’s bottom |
| 700Hz | Body of the 808 |
| 1kHz – 2.5kHz | High-End |
As you can see, the most prominent frequency area of 808s on small speakers is actually 700Hz.
So, to make your 808 stand out on small speakers, make the 700Hz loud & clear.
Step #2: Saturate The 808’s Mid-Range
Soft clipping & saturation can both help you boost the punchiness of your drums and actually boost the presence of your 808 on small speakers.
How Can Saturation Help You?
Saturation can help you whenever you want to add new frequencies to a sound. (In contrast to an equalizer that can only boost or lower existing frequencies).
Let’s see what happens when we add saturation to a single frequency generator.
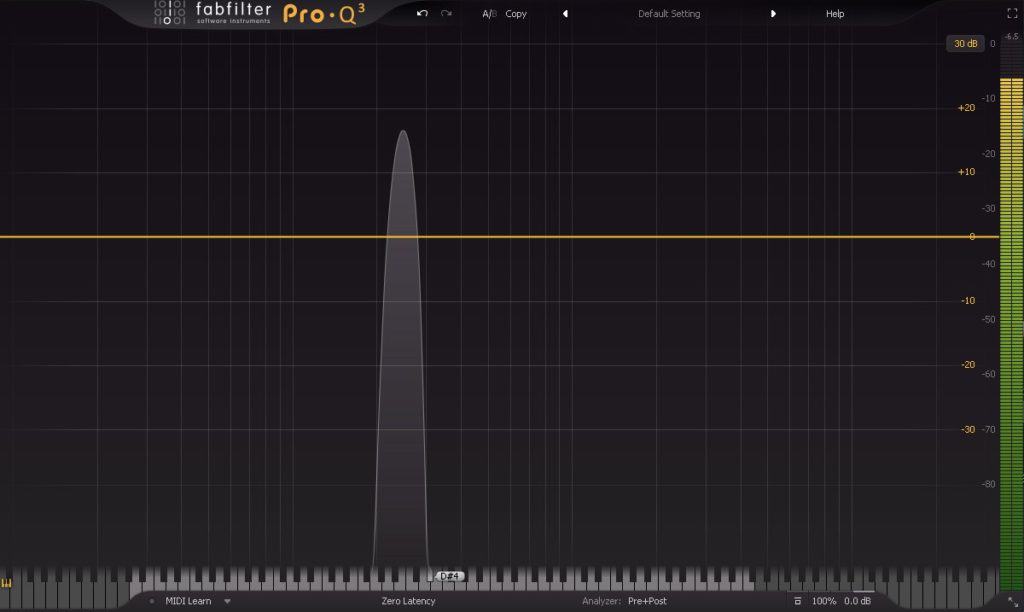
Now, let’s add saturation.
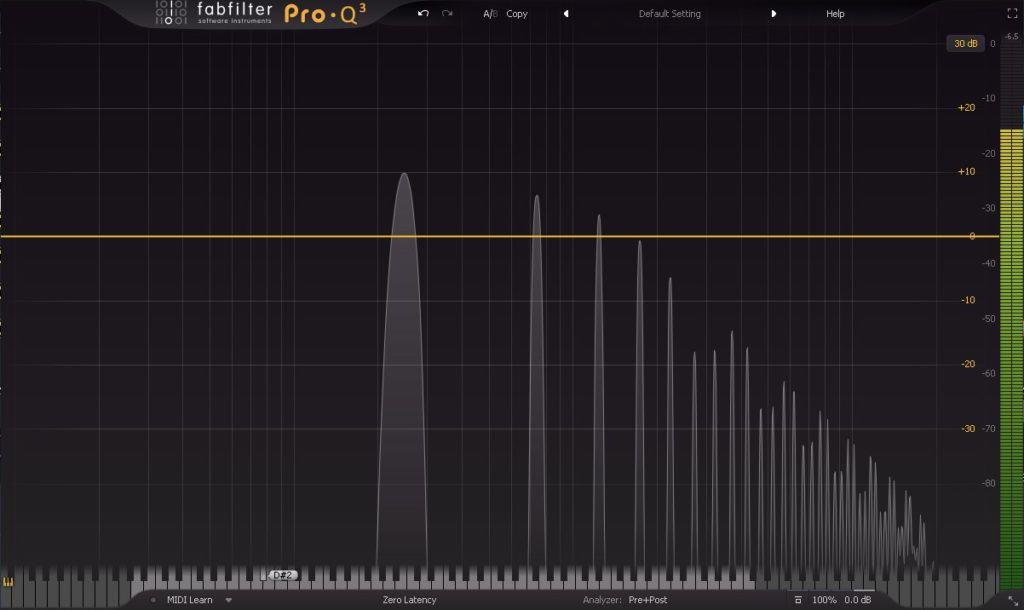
As you can see, the saturation added a bunch of new harmonic frequencies that make the sound richer.
It can really help with thin kicks and 808s by adding more mid-range and low harmonic frequencies to it and help with kicks & 808s that aren’t bright enough by adding top-mid and high-end frequencies.
Now you may ask yourself – How can that improve the presence of my 808 on small speakers?
Well, as you may know, small speakers such as phone or laptop speakers can’t really output anything below 100Hz at all and kind of suck at outputting any low-end as well.
Therefore, the only way to make something stand out more on small speakers is to boost its higher frequencies. For 808s, it’s the 700Hz area that does the trick.
So, if you saturate the mid-range (around 250Hz – 700Hz), it’s going to add lots of harmonic frequencies around 700Hz and, therefore, make your 808 a lot more prominent on small speakers.
How Can Soft-Clipping Help You?
Soft Clipping works very similarly to saturation. They both add new harmonic frequencies, and as written above, both can help you make your drums punchier.
However, there’s one major difference between them – Soft Clipping only affects the loudest parts of the audio signal. It’s basically saturation with a higher threshold.

SoftClipping VS Saturation Illustration
As you can see, the threshold of saturation is so low, it allows it to affect every part of the audio. However, the threshold of the Soft Clipping only lets it affect a small part of the audio.
The Conclusion
Use saturation when you want to affect the whole sound and not just the punchy part, and soft-clipping when you want to affect just the punchy part.
Step #3: Boost The 808’s Transients
The human ear is set to focus on high frequencies a lot more than low frequencies. And, as you already know, the transients of 808s contain most of their high frequencies.
Therefore, if you boost the transients of the 808, not only small speakers will output more of it, but the 808 will be a lot easier to focus on and understand.
If you want to understand absolutely everything you need to make your 808s punchy, and therefore massively improve your 808’s sound on small speakers check out this article that I’ve written – “5 Methods To Make Your 808s Punchy That Actually Work!”.
In this article, I cover all 5 methods that make your 808 sound super punchy and bouncy, but that also keeps it sounding balanced and not muddy.
Now I’ll cover two of those five methods –
- Use a transient shaper
- Use a compressor with a long attack
How to boost transients with a transient shaper –
To boost transients with a transient shaper you’d basically need to do two things –
- Get a transient shaper
- Boost the attack knob
I personally use the DS-10 Drum Shaper by XLN-Audio for pretty much any transient work that I need to get done. It’s fast and easy to work with, and I always get it to sound exactly how I want it.
It has three modes – kick, snare, and bus. I found that the kick mode works the best for 808s.
I was actually surprised at how cheap I was able to get it at Plugin Boutique’s website in comparison to the other plugins.
How to boost transients with a compressor –
To boost transients with a compressor use a compressor with a long attack time and a medium release time so that the punchy part isn’t affected by the compressor, and all the parts after the punchy part are reduced. Then they put on a little bit of makeup gain.
This way, the punchy part is boosted, and all the other parts aren’t affected.
Let’s look at this example to understand it better –
The Original Kick –
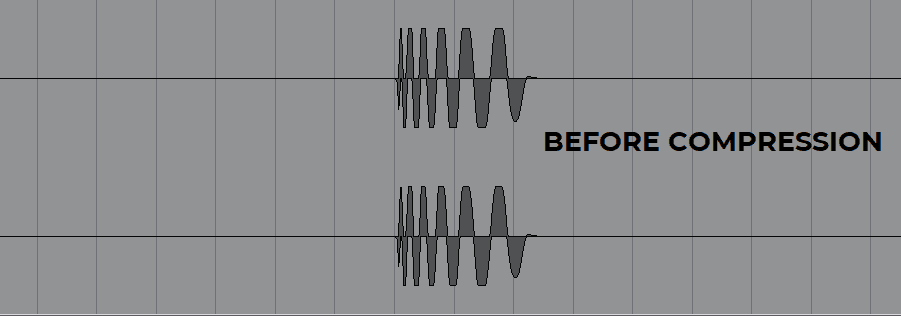
As you can see, the kick’s transient part is just as loud as the other parts, and therefore, the kick isn’t very punchy.
Kick After Compression –
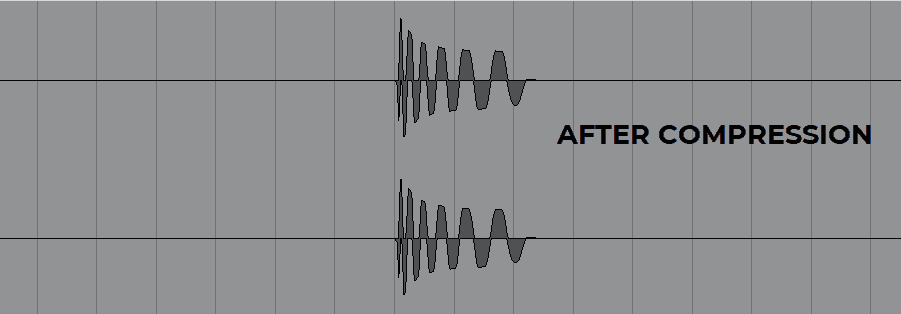
Now, the kick’s transient part is a little bit louder than the other parts of the kick, which makes it significantly punchier.
There are many compressors you can use for this matter, but the best by far is The Glue by Cytomic.
I actually use this compressor for pretty much anything I need including any instrument/drum you can think of and even mastering.
I like it so much because it always gets me the most balanced and realistic sound, and it’s incredibly simple to work with.
Step #4: Check Your Mix On Small Speakers And Make Necessary Changes
There are two main ways I use to check how your mix sounds on small speakers.
The speaker simulator way (Recommended)
This way is by far more convenient, fast, and simple since it doesn’t require you to do much, and you’ll be able to check your mix as you go, without having to export it. Pretty much all you’ll have to do is load a plugin on your master bus.
I’ve tried many speaker simulators over the years, but the best one by far is MixChecker by Audified.
It can simulate 12 different sets of speakers including a phone, a laptop, a car, an iPad, and more. And actually, I must say that they’re doing it in a very accurate way.
You can be sure that if you get this plugin, you’ll be able to make all your 808s and beats sound good on any speaker that you may think of.
And, while it does that very accurately, I don’t use it only for testing and referencing.
I actually use this plugin sometimes just for special fx parts/elements of songs. Sometimes it can add a super cool part that makes songs memorable.
Checkout MixChecker on Plugin Boutique.
The manual way
To use the manual way of testing your beats on small speakers all you’ll need is to have a smartphone/laptop/any other pair of small speakers, and an ability to play your beat through them.
This way is a little less comfortable since it usually requires you to export your track and transfer it to your phone over and over again, but it gets the job done.
I’ve personally used my phone to test tracks & beats for a long time before I understood I should just get MixChecker, and it went ok.
The one thing that bothered me though is the countless times I spent exporting and transferring over and over again until I got it right.
But, if you follow all the tips I’ve mentioned in this article, you’re supposed to be able to make it in one shot.