Is It Necessary To Mix Your Beats?
Mixing your beats might be a tough procedure, but you must do it in order to make them sound professional and give them a chance at getting you major placements. However, you might not need to spend hours doing it. It can take as long as 5 minutes.
In this tutorial, I’ll explain each one of the steps you have to take in order to mix your beats and make them sound professional and get you major placements and sales.
However, just before we start, if you’re not professional at making beats (yet), and you want to get better at it, I really suggest you check out this article that I’ve written. I really put everything that you’ll ever need to make awesome beats into it.
Step #1: Gain Stage Everything To Be -12dB
Correctly gain-staging your mix is the most important step to mixing your beats since it will help you guarantee that your beats won’t clip and get ruined.
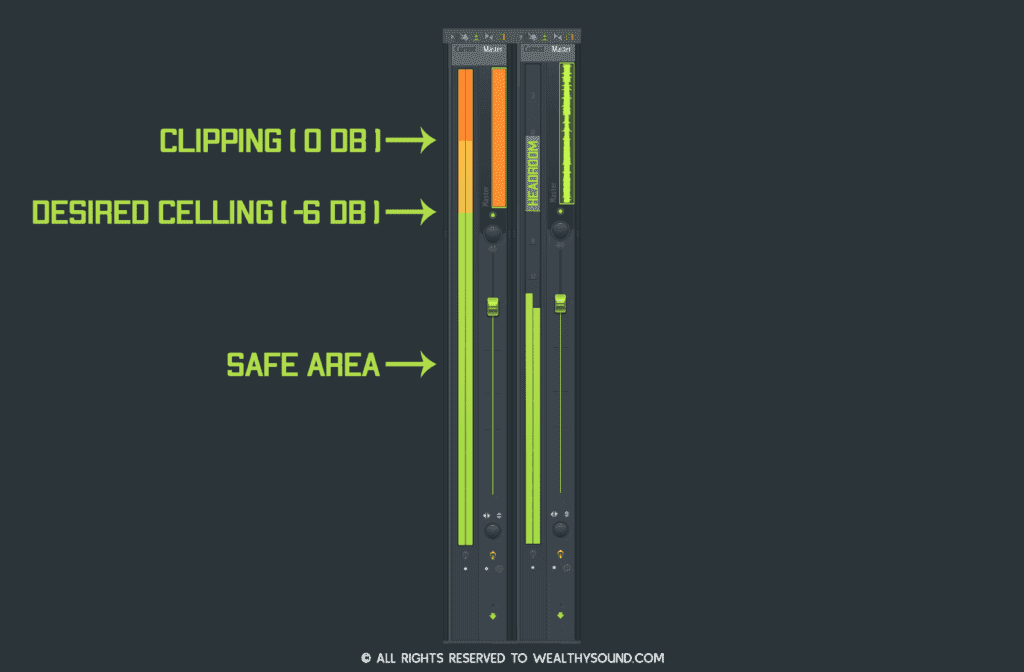
What Is Clipping?
Clipping happens when a track gets louder than 0dB. When it happens, the daw&audio interface can’t contain it, so they cut everything that gets above 0dB causing weird distortion and artifacts.
Clipping will also ruin your master since you won’t be able to use a limiter properly.
The limiter’s job is to keep everything below a certain level. If a track gets louder than 0dB by 5dB, for example, it will turn everything down by 5dB.
The problem with that occurs when your kick/808s hit.
When the kick/808s hit, they crank up the master gain causing the limiter to turn everything down for a few milliseconds and then return to normal, making your beat sounding anything but professional and balanced.
How To Prevent Clipping?
Preventing clipping is actually fairly simple. All you have to do to prevent your beats from clipping is to make sure that each one of your channels peaks below -12dB.
By making sure that all of your channels peak below -12dB, you’re making sure that you’ll have enough freedom to level your channels however you want to without ever passing that 0dB barrier.
But, it’s important to mention that it’s recommended that you don’t use the mixer to do so but the channel rack volume. This way, you can start fresh with balanced mixer channels.
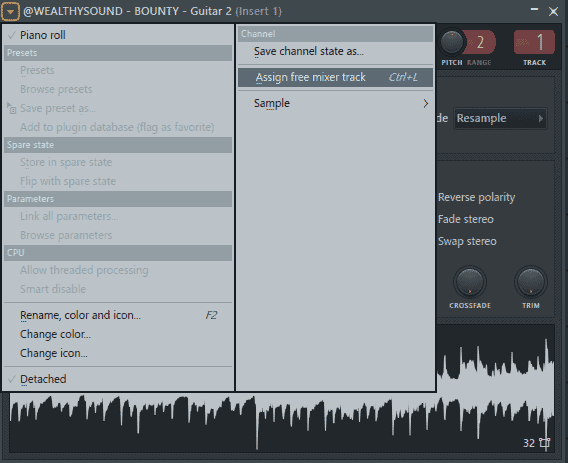
Step #2: Assign Everything To A Mixer Channel
In order to apply effects such as EQ, reverb, compression, etc.., you’d need to assign the channel to a mixer channel.
This way, you’ll be able to level everything easily and have full control over each channel.
To assign something to a mixer channel in FL Studio, click it in the channel rack, click the little arrow at the top left corner, and then click “assign free mixer track”.
Step #3: Level Everything In The Mixer According To The Kick
After you’ve linked every track to the mixer, you may go and start leveling each one of the mixer channels, so everything sounds balanced, and each channel has its place.
My favorite way of leveling
While there are many ways of leveling a mix, and there’s no right or wrong as long as there’s no unwanted clipping involved, this way is the best for keeping you safe from clipping and achieving a well-balanced mix.
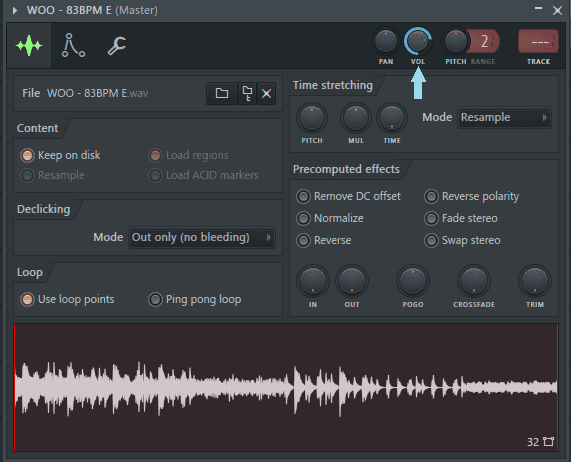
Step #1: Set the kick’s peak to be -12dB
Always keep the kick’s peak at -12dB no matter what. Even if you apply effects to it, make sure that you adjust the output volume knob of them, so it stays at -12dB.
This will give you a great leveling starting point to count on.
This will make sure that your mix will never clip and give you enough headroom for the mastering in the end.

Step #2: Boost the master channel in the mixer to the max volume
Boosting the master’s bus channel volume by the maximum volume in the mixer (5.6 dB) for the leveling process will make sure that your mix will never clip and give you enough headroom for the mastering in the end.
Now, instead of making sure that your mix peaks at -6dB, you can just make sure that it doesn’t clip, and you’re good to go.
Step #3: Level all the other channels (starting from the 808)
Since the hardest and most important part of mixing is usually making the kick & 808 hit right, it’s best if you start from it. If you get them balanced correctly, it will give you a much clearer image of the mix and prepare its base parts.
I usually like leveling with a bottom-top method. Meaning that I start from the base parts (kick, 808, drums, etc..), then I go to the mid parts (chords, pads, etc..), and then I level the top elements (vocals, leads, etc..).
But, you should level your tracks in whatever way you want to. As long as you don’t change the kick’s volume, it’s alright.
Step #4: After you’re done leveling, return the master track’s volume to 0dB
If you’re done leveling everything, you may go ahead and lower the master’s bus channel volume back to its default (0dB).
Step #4: EQ Each Of The Channels (Where Necessary)
Now it’s time to EQ each of the channels in your mix. For those of you who don’t know, EQing is all about boosting & reducing certain frequencies. For example, you can boost the bass, reduce the mid-range, cut the high-end, etc.
To start EQing though, we need to know something called the “human frequency spectrum”.
The human frequency spectrum describes the range of frequencies that humans hear. It starts from 0Hz and goes up to 20,000Hz which is sometimes referred to as 20kHz (k = 1000).
The point of EQing is to make sure that all elements in your mix are well balanced within this range. You may think of your mix as three boxes (low-end, mid-range, high-end) that are inside one big box.
Here’s an illustration that describes the three parts of it easily.
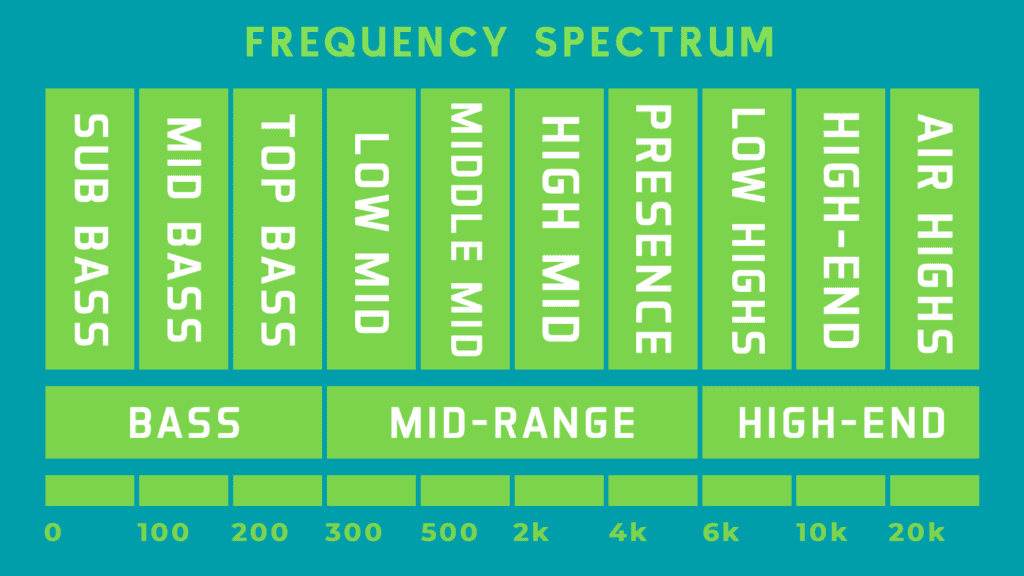
And, in order to fit all of your elements in nicely, you have to make sure that you have enough space left in their box and in the total box.
For example, when I want to fit an 808 in the mix, I make sure that none of the elements that aren’t supposed to be in the low-end have low-end frequencies. This way, the 808 has enough space to fit in without causing muddiness/clipping.
If you want to learn more about how to fit your 808s in the mix and make them stand out, especially on small speakers, read the article I’ve written, “How To Make 808s Sound Awesome On Small Speakers!”
If, for example, I want to fit in an acoustic guitar with a very prominent mid-range, I make sure that all the other elements don’t have a super prominent mid-range by reducing other elements’ mid-range.
If you follow this guidance, you’ll be a pro at EQing in no time. However, there are a few more tips that will help you massively that I want to give you today.
Tip #1: Make Things Right From The Beginning
Before you start EQing, take a minute to think about how you want the final version of the beat to sound like, and plan things accordingly.
For example, if you want the beat to be punchy and heavy, boost the high-end of the kick, and lower its low-end to make more space for the heaviness of the 808 to come in.
Tip #2: Avoid The Solo Button

In the end, the most important thing is the context of each channel with the rest of the channels. It’s all about how all the channels react with each other.
And even though the changes you make sound great on solo, it doesn’t necessarily mean that they will sound good in the mix. Therefore, try to avoid it as much as you can.
There will be times when the solo button will be useful. After all, it’s there for a reason. For example, when you try to remove resonating frequencies the solo mode will be incredibly useful.
However, try to avoid it unless you need it for a very specific reason.
Tip #3: Reduce/Cut Before You Boost
Since there is only a certain amount of space that you have in your mix, you may find yourself in situations where you feel like you need to boost certain frequencies of an element even though it has enough of them.
This usually happens due to another element(s) that’s taking up all the available space for these frequencies in the mix.
Therefore, when you feel like you need to boost an element, listen to it in solo mode, and ask yourself whether it sounds good alone. If it does, it may be that reducing/cutting is actually what needs to be done.
By doing this instead of just boosting everything, you guarantee that your mix will be clear and organized.
Step #5: Pan The Drums Correctly
Panning your drums and using the stereo field properly can take your beat from sounding ok to sounding professional and amazingly mixed.
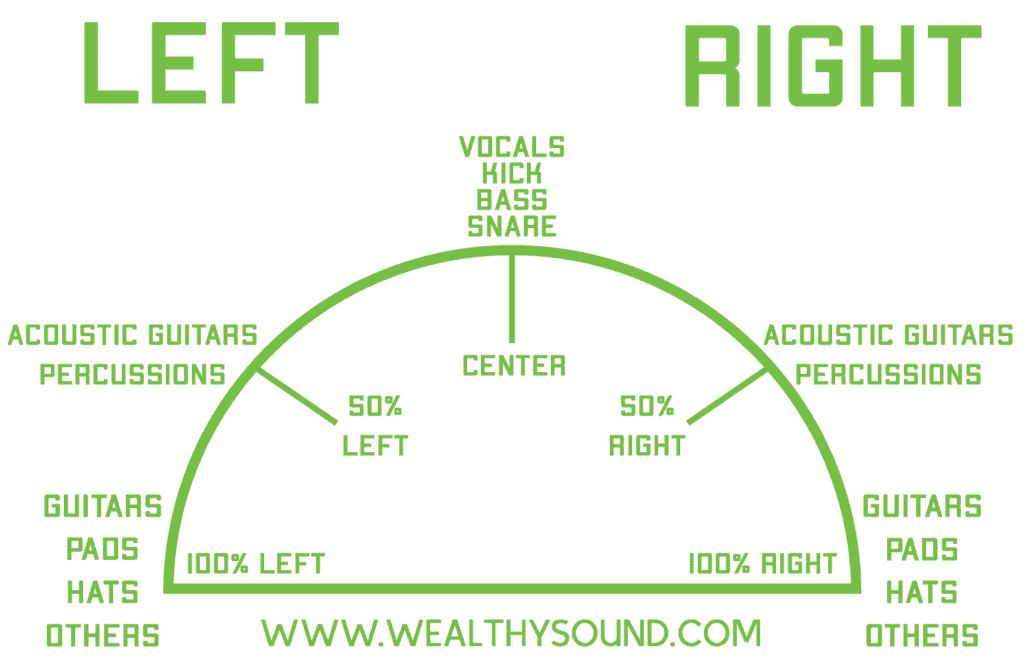
So, let’s look at each of the drums and see how they should be panned.
Kick & 808 – Mono
Have you ever heard a song where the low-end sounds great on headphones but sounds weird & messy on actual speakers and just horrible on cars?
If you have, the reason for that was that the kick/808 were not set to mono making the track anything but mono-compatible.
Traditionally, the kick & 808 shouldn’t be panned or have any width at all since they contain mainly low frequencies.
Low frequencies aren’t directional, so we can’t really understand the direction they’re coming from. Therefore, there is no point in panning them or making them stereo.
Moreover, when you make something wider, you push it more towards the back of the mix instead of the front.
And usually, you want the kick & 808 to be centered and upfront.
Snares & Claps – Stereo/Panned/Mono
The snare is one of the elements that is totally up to you and your song.
Usually, snares tend to be stereo, but several reasons might make you consider making them mono.
If you want to focus on your snare and make it more centered and impactful, you might want to set it to mono. The reason for that is the same for the kick – As you make something wider, you also push it back in the mix.
But, stereo simulates the sound of space. Therefore, snares do sound better in stereo.
That’s why it’s important to A/B test this on every mix that you work on, and determine that accordingly.
My recommendation – Widen the top frequencies of the snare, and keep its low-end frequencies mono.
This way, you can keep the snare powerful and save the sound of the real space.
You can do that with a multiband stereo imager.
Percussion/Toms – Panned/Mono
Usually, toms should be sort of in the middle of the mix.
They shouldn’t be too noticeable, but they also shouldn’t be far in the back of the mix.
Now, you might be asking yourself – How can I get this balance?
There are three main ways that you can use to achieve that –
Panned Toms –
This is my favorite way to fit the toms in the mix.
Since opposed to other panned drums, the toms are focused on the low-end and mid-range and not on the high-end, you can easily fit them in the sides of the mix.
Plus, it also adds extra width to the track, so why not?
Mono Toms –
Sometimes, you would really want your toms to be dominant and upfront, and it would just make more sense to make them mono.
But, there is a big problem – when toms are set to mono, they fight with the kick and the 808.
Therefore, if you want to set your toms to mono, you’d have to highpass their low-end and make sure that they don’t hit together with the kick.
Step #6: Add Special FX (Reverb, Saturation, etc..)
Adding special fx to your tracks is actually incredibly important since it can easily fix major problems or give you an interesting touch to your beats.
Let’s look at what each special effect can be used for.
Reverb
If your beats often sound too dry, it’s apparently because you don’t use reverb as good as you can.
Reverb creates a simulation of space, so it makes your mix sound like its being played in a real space, which is excellent, as long as you don’t use it too much.
It can also help a lot to a muddy mix, to a narrow mix, and a too dry mix.
Another thing reverb can help with a lot is with making smooth transitions and filling up space.
I usually put a little bit of reverb on drums and vocals, and if the loop I use came in dry, I add reverb to it as well.
Saturation
If something sounds dull or empty, and you want it to sound warmer and more exciting, you should probably just add saturation.
The main effect of saturation over the sound is adding harmonic frequencies.
Saturation can help you whenever you want to add new frequencies to a sound. (In contrast to an equalizer that can only boost or lower existing frequencies).
Lets see what happens when we add saturation to a single frequency generator.
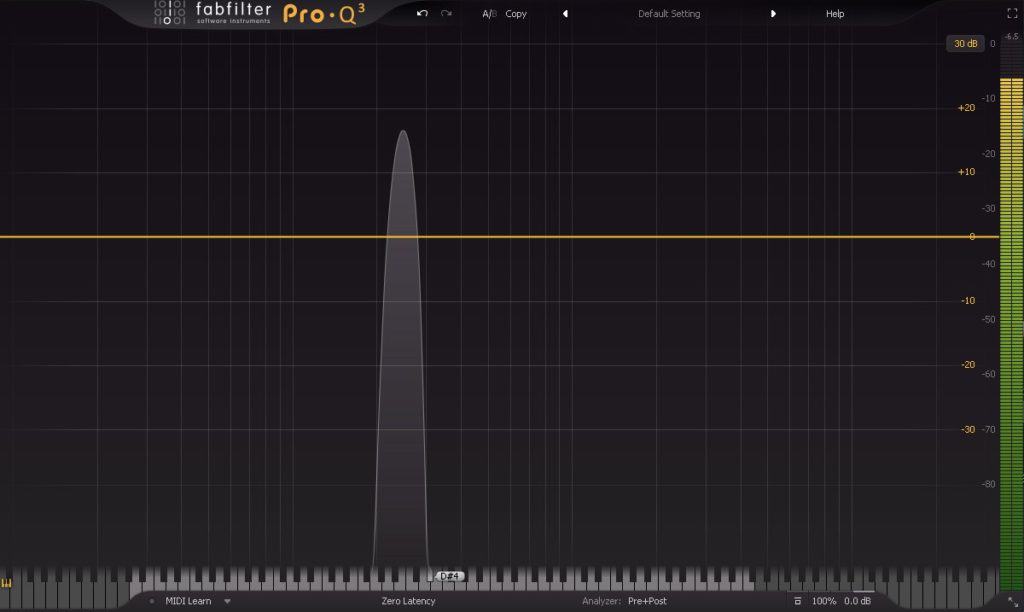
Now lets add saturation.
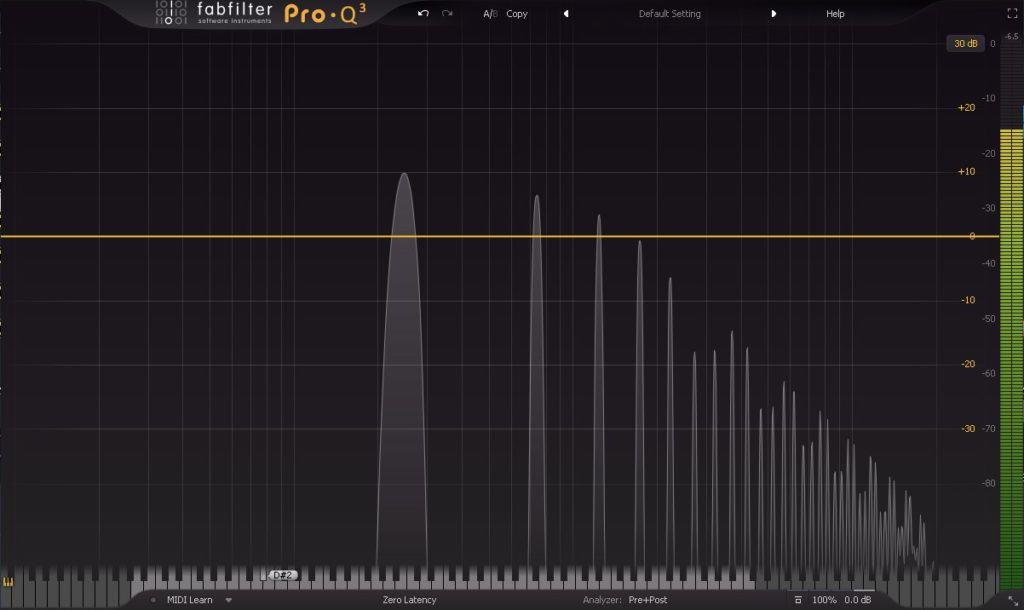
As you can see, the saturation added a bunch of new harmonic frequencies that make the sound richer.
For example, it can really help with thin vocals by adding more mid-range and low harmonic frequencies to it.
Compression
Audio compression can make or break your song, so it’s crucial to learn how to use it correctly.
I recommend to use compression when you want to:
Shift the dynamic range:
If you have a track that has a dynamic range that’s bigger than what you want, you should apply compression to it.
Just remember not to over compress it, or else it will start to sound boring.
Shift the transients:
You can use compression to shift transient and make something punchier or softer.
If you want to make something punchier, set a medium-low threshold, a medium-high ratio, and a long attack time.
To make something softer, do the same, but set a short attack time.
Of course, you can do that in many other ways, such as equalizing, saturating, distorting, and more.
Glue two or more elements:
If you have a couple of elements that play the same parts, you should process each one separately, route them all to a bus channel, and process them all together.
Compressing them all together will create a unified sound that will improve your mix drastically.