Audio compression can make or break your song, so it’s crucial to learn how to use it correctly.
It’s being used in every new and old song that you hear. You can use it to keep tracks balanced, to shift transients, and to blend things together.
If you want to learn how to use a compressor correctly, keep reading this tutorial, where I’ll explain everything you need to know to use it professionally.
How Does Audio Compression Work?
To understand how to use a compressor, we must first understand how audio compression works, and to realize that we need to understand what “dynamic – range” is.
Dynamic Range
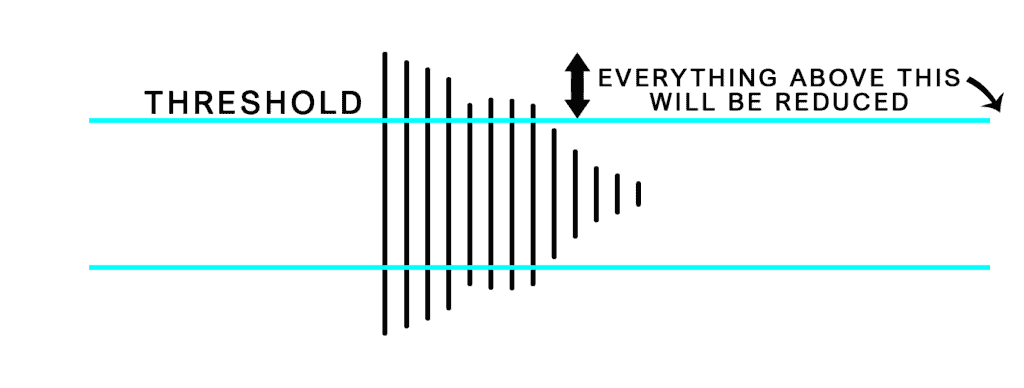
Dynamic range is, as you see in the picture – the distance between the highest dB value to the lowest dB value.
A too big dynamic range will sound confusing and unstable, but a too-small one will sound too stable and boring, so it’s best to always keep it somewhere in the middle.

The Compressor’s Course Of Action
The compressor’s final result is minimizing the dynamic range of your track.
It does it by reducing the gain of every sound that goes over a certain level (called threshold).
Threshold
The threshold is the level where the compressor starts listening to your audio signal.
When we set the threshold to -3dB, it means that the compressor will affect only the parts in the signal that are above -3dB.
It’s essential to take some time in the beginning and try to determine where exactly you want to set your threshold.
Usually, I would try to think about the way I want the track I am working on to sound like.
When I work on a track that is mainly stable but has some peaks in it that I want to flatten, I set the threshold pretty high, so it only affects those peaks.
And when I work on a track that is unstable and has many different levels of peaks, I would set the threshold pretty low, so it affects all of the peaks.
Ratio
The ratio is the amount of compression that the compressor applies to the signals that go over the threshold.
When you set your ratio to 2:1, it means that for every 2dB above the threshold, 1dB will be outputted, and 1dB will be reduced.
Attack
The attack is the time it takes for the compressor to start affecting the sound and reducing volume.
If you want your sound to be punchy, it’s better to set a long attack so the compressor will only reduce the parts after the punchy section.
And if you want your sound to be soft, it’s better to set a short attack that way, the compressor will divide all the parts that go over the threshold by the ratio amount, and the result will be a softer sound.
Release
The release is the time from the moment the compressor starts reducing a sound until the moment it stops reducing it.
Long release times are great for smoothing out dynamics.
They can also be used to push an instrument back in the mix or even control its depth. However, if the release time is too slow, the compressor won’t release in time for the next hit, which can suck the life out of an instrument.
Using a fast release time adds excitement and aggression to tracks.
It can also be used to increase the perceived loudness, which works great on room mics.
However, setting the release time too fast can sound trashy or gritty and cause unwanted pumping artifacts, which occur when you can audibly hear the compressor clamping down.
Therefore, my recommendation is to start by setting the release time so it’s slightly longer than the length of one beat in your project.
To get this length of one beat in milliseconds – divide 60000 (which is the number of milliseconds in one minute) by the BPM of your songs.
For example, if my BPM is 120 than 60000/120 = 500ms.
Therefore my initial value for the release time would be 500ms – 530ms, and then I’ll tweak it as needed from there.
Notice that it would only work that way if you’re trying to compress long-range dynamic differences.
When Should You Use A Compressor
First of all, it’s important to understand that there are no rules here.
If you think that you need to compress something, and you know why and how to do it, just do it.
Now, it’s not always correct to apply compression, over-compression can make your songs sound dull and weak.
I recommend to use compression when you want to:
Shift the dynamic range:
If you have a track that has a dynamic range that’s bigger than what you want, you should apply compression to it.
Just remember not to over compress it, or else it will start to sound boring.
Shift the transients:
You can use compression to shift transient and make something punchier, or softer.
If you want to make something punchier, set a medium-low threshold, a medium-high ratio, and a long attack time.
To make something softer, do the same, but set a short attack time.
Of course, you can do that in many other ways, such as equalizing, saturating, distorting, and more.
Glue two or more elements:
If you have a couple of elements that play the same parts, you should process each one of them separately, and then route them all to a bus channel, and process them all together.
Compressing them all together will create a unified sound that will improve your mix drastically.
Create special effects:
You can use compression to create special effects.
This is a great way to separate yourself from all the others, and make unique, interesting productions.
For example, you can create a pumping effect by side-chaining your leads’ reverb, so the reverb comes in only when the leads come out.
To understand how to use reverb better and make it suit your mix I highly suggest you to check out my guide “How To – Use Reverb The Right Way”.
Sidechain Compression
First of all, for those of you who don’t know –
What Sidechain Compression Is
Sidechain Compression is a production technique that allows you to decrease the volume of one element when another element comes in.
This way, you can make space for all of the elements in your mix – usually, you sidechain your bass to make space for your kick.
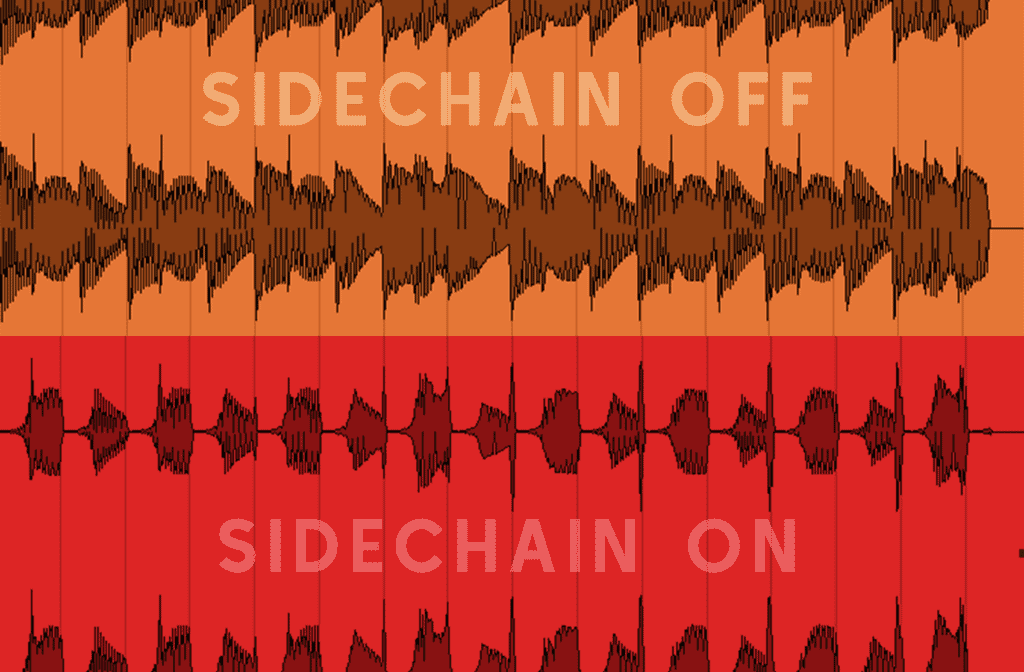
Sidechain Compression works just like a regular compressor except for one thing.
Sidechain Compression uses an external signal to trigger the compression (instead of the threshold that a standard compressor uses).
Sidechain Compression is especially popular via Hip Hop, Trap, Pop, Future Bass, and every genre that has a drum pattern that’s not sharp on the beat.
Since the gate sidechain method can only work with const beats, it’s great for genres like Progressive House, and Big Room where the kick is sharp on the beat, but it’s not good enough for genres where the kick pattern is complex.
An excellent gate-sidechain plugin is LFOTool by Xfer Records.

It allows you to make your sidechain curves, and design them exactly how you want them, so you can get perfect matches between the elements you side chain and those you don’t.
The plugin also allows you to make panning envelopes and filter envelopes so you can get super creative and unique results using it.
How can sidechain help you?
You can use sidechain to decrease the volume of the bass every time that the kick comes in.
This way, you can make room for your kick to be punchy and “cut through” the mix.
If you feel like something just can’t cut through your mix, or just doesn’t have enough space, you can use a compressor to lower other tracks when it’s coming in.
The most common use of side-chain compression is the kick and the bass.
Most basses don’t leave enough space for the kick, so to make space for it, you use side-chain.
Compressor VS Limiter
The compressor and the limiter share the same parameters, but they use them a bit differently.
As we already know, the compressor divides what’s above the threshold by the ratio.
The limiter, on the other hand, doesn’t let anything go beyond the threshold.
If you set the limiter’s threshold to -3 dB, the limiter will make sure that nothing goes above -3 dB. This is the reason a limiter is called a “brick wall”.
When should you use a limiter:
Basically, you need to use a limiter on your mix bus only. The purpose of the limiter is to turn up the volume of your song without distorting it, that’s why you only use it for mastering.

If you are sending your tracks to a mastering engineer, you don’t need to put a limiter on anything, He’ll take care of it.
But, if you’d like to master your song by your self, I highly suggest that you check out my article – How To – Master An EDM Track In 7 Easy Steps.
Even though it is focused on EDM tracks, it is super relevant to all genres. So, you can easily apply the knowledge that you’ll learn there to any genre you’re making.
But if you are mastering your tracks yourself, add a limiter to the mix bus after you finish working on the mix.
My Top 5 Tips For Compression
1. Use Only One Compressor Plugin –
Unless you’re already really familiar and experienced with compression, you better not use more than one plugin.
It’s super easy to get confused with all of the different parameters and controls of all of the different plugins out there.
Therefore, using only one plugin and knowing it well is a lot better than using lots of plugins and not knowing any of them.
2. Make Intentional Choices
Even if you know how to use a compressor perfectly, you don’t have to always use it. In fact, there are a lot of instruments and elements that you won’t have to compress at all.
So, before you automatically load a compressor on every channel in your mix, listen to it, and find out if you hear anything that needs to be fixed.
In the end, you should always trust your ears and let them decide.
The flip side of this (that’s not better) is avoiding using the compressor aggressively.
Like I said above, in the end, the only thing you should trust and count on is your ears. So if you find it necessary to compress something aggressively, DO IT.
Bottom line, do anything that you find necessary, As long as you know why you’re doing it.
3. Start With General Decisions
At first, it can be extremely hard to set the value of each parameter correctly, and you might get overwhelmed by all of the different options and parameters that you have to configure.

Therefore, it’s always better to start with the general decisions before you get into details.
For example, instead of trying to configure the exact millisecond of the attack time right when you start compressing, start by thinking whether you want a fast attack or a slow one.
Then go and fine-tune your decision.
This way, you won’t get intimidated by the process of compressing and configuring all of the parameters, and you’ll develop the ability to trust yourself when it comes to compression over time.
4. The whole is more important than the parts

This is true not just for compression.
Don’t forget that your final goal is to make your mix sound better.
Therefore, your final choices must be made while hearing how your current track interacts with other tracks in your mix.
To do that, you’ll have to bypass and avoid the solo button.
Because, whenever you solo a track, you remove it from the context of your mix.
Don’t avoid the solo button completely
It’s ok to use the solo button when you need to hear something very specific, its there for a reason.
For example, when I try to balance small and little peaks, I do it with the solo mode activated.
But, when I make my final decisions for a track, I do it in the context of the whole mix.
5. Use Automation When It’s Needed
Automation is a huge tool for music producers that allows you to change any parameter of a plugin, or a track in a specific time.
Sometimes, we tend to think that if we configure the compressor’s parameters good enough, then we won’t need to change anything manually through automation.
But, sometimes, that’s just not the truth.
For instance, sometimes, you might want to change the attack of your kick in the chorus to be slower, so it’ll be more punchy.
Or, you might have a vocal recording that has a part with louder peaks than the rest of the recording.
The truth is that compression is great, and it will usually do 90% – 95% of the work for you.
But, automation is the tool that will give you the extra percents that separate nice home-made tracks, from amazing professional tracks.
So, don’t be afraid to use it whenever you need to make a change to a specific part of a track.
Common Compression Mistakes
1. Over Compressing
This is by far the most common mistake among beginners when compressing, and it is one of the most horrible ones because it cannot be fixed after it’s bounced.

But, don’t freak out because it’s one of the easiest mistakes to recognize and avoid.
In order to fix it, look at the gain reduction meter and make sure that it isn’t reducing the signal too much.
Usually, 3dB – 4dB would be a great amount of reduction to aim to, but it may vary between different instruments and recordings.
So always do A/B testing to your compression decisions.
Make sure though that you match the output gain of the compressor to the input gain.
That way, you won’t get distracted or confused by the extra gain that the compressor may add or reduce.
2. Casting all of the job to one compressor
Even though the compressor is indeed a powerful tool, sometimes one instance of it just can’t handle all of the different types of reductions that your track requires.
Most dynamic tracks usually require two types of compression.
Micro-dynamic Reductions – These are the reductions that handle all of the short and small-range peaks.
For this type of reductions, you may want to set a long attack time to preserve punchiness, or you may set a short attack time to make your track sound more balanced.
You’ll usually set a higher threshold for this type of reductions because you only want to apply compression to short-range peaks.
Also, you may want to set a higher ratio for reductions, since you usually want it to flatten the peaks, and make a significant difference.
Macro-dynamic Reductions – These are reductions that handle the over-all dynamics.
They handle the long-range dynamic changes.
For example, you may want to use this type of reductions on vocals, to balance the difference between a quiet part of the vocals to a louder one (for instance – the chorus and the verse).
For this type of reductions, you may want to use a lower threshold so that the compressor would work more consistently, and won’t be affected by the small and short-range peaks.
Also, you usually set a lower ratio for these reductions, so it won’t over-compress your tracks.
3. Compressing Before You Equalize
If you’re compressing your tracks before you equalize them, properly, you might be ruining your dynamics without even knowing it.
Unequalized tracks might have lots of unnecessary low-end frequencies, and resonating frequencies that can mess with the compressor, and shift its reduction amounts.
Therefore, it’s usually best to equalize the tracks before you compress them.
Obviously, you may still use equalization after you compress.
But, you have to make sure that you clean all of the unnecessary and resonating frequencies that may mess with the compressor before you compress.
To learn more about equalization and to get my 5 super helpful eq tips, I suggest you check out my article 5 Actually Equalizer Tips That Actually Work.
4. Monitoring Too Loud
If you listen to your track at a level that is too loud, you remove your ability to define and understand the real dynamics of the track.
Besides, you also risk hurting your ears.
Therefore, it’s much better to listen at a low loudness level.
That way, you can keep your ears safe, and you’ll really increase your sensitivity to the dynamics.
My Recommendation – Listen to your track at a level that allows you to have a conversation with a friend without speaking louder than you usually do.