So, you’ve decided that you want to make beats! And you want them to sound like beats that fit Polo G, Roddy Rich, and Juice Wrld But then you stumble upon an issue:
The Internet is full of tutorials and articles, but most people are still clueless about it. So you find yourself either making unrelated genres or always searching for that one complete good tutorial.
That’s why in this article I will show you everything that you need to have and do in order to make hit-level beats in a step-by-step way so all you have to do is easily follow along.
Now, before we go any further, here’s what we’ll make today:
So, let’s get started! For your convenience, here’s a table of contents that you can use to jump straight ahead to your favorite parts:
Step #1: Get Quality Drum & Melody Samples That Fit Each Other
The first thing every producer needs to make beats is drum & melody samples that are both high quality and more importantly – fit each other.
Now, there are a few options you can use to find such samples. Here are the ones I like the most:
Option #1: Splice / Loopcloud (Monthly Subscriptions)
Splice and Loopcloud allow you to download and pay only for the samples and presets that you download and use. So that way, you get a good return on your money.
They both work on a monthly subscription basis, which gives you a certain amount of credits you can use each month to buy samples. (If you don’t use them all they’re kept in your account for future use).
Splice and Loopcloud both charge 7.99$/Month for 100 credits (which is usually more than enough).
It seems like there isn’t much of a difference between the two, but, there are a few major differences.
If you’re interested in a detailed comparison of the two, go see this article I’ve written where I explain all the pros and cons of both these services, outline all the major differences of them, and explain which one you should use.
Option #2: Get Loop / Drum Kits (Free / One Time Payments / Share Royalties)
Loop & drum kits are essentially a pack of usually 5 to 100 or even more samples that are usually in a specific style or genre.
You can get kits from various places around the internet, like Youtube for example by searching “[Your favorite artist name] type [Instrument] [loops/drums]”, however, there are lots and lots of loops that are either just boring or worse – not quantized and mix-ready.
Now, you can somehow get your way with unsynced loops if you’re using midi files, but when you want something like guitar loops, this type of loops may create a whole lot of work for you, or worse – ruin your beats altogether.
That’s why we’ve decided to make our guitar loop kit that contains 20 royalty-free loops that are 100% quantized and mix-ready, so you get a really good start producing and don’t have to experience that exhausting feeling of scrolling in Youtube for hours searching for loops.
Click here to see the “BREEZE” loop kit in action, and hear examples of loops that are in the pack.
Is there a free option to start from?
Yes! we now also give our “Instagram” loop kit for free for you guys to use and enjoy! Click here to get your free copy.
Option #3: Collab With People (Share Royalties)

This option is a little hard when you’re just starting and have no connections, but will get easier as you spend more time producing, and get more of a following.
However, it doesn’t mean that you can’t start even when you have no followers and no mates on social media. Just start following people that are interested in the same style as yours, and get yourself out there.
Even if you message 10 people and 8 of them don’t answer, 2 of them will, and you’ll get collaborations.
It’ll also help if you upload some type of content that relates to music that way when you direct message someone they can see your musical style, and relate more to you.
Step #2: Pick The BPM (Beats Per Minute) Of The Beat
You can think of BPM which stands for (Beats Per Minute) as the speed of your song. The higher your BPM is the faster your song will be and the lower it is, the slower your song will be.
The BPM is a major part of what determines the style of your beat. Therefore, the first thing you’d have to do in order to make hit-level beats is to set the BPM.
The common range for Trap & Hip Hop beats is 140-180 BPM while some outliers reach even further like 130 or 190BPM.
If you use a pre-made loop, it’ll come with its own BPM and you’ll have to sync your beat to it in one of these two methods –
Method #1: Set its mode to stretch (Recommended) – This method is my favorite one just because it’s super easy & fast to configure. To use it just set your project’s BPM to the BPM of the current loop you’re using and then double-click on the audio clip, and change its mode to “Stretch” like in the image below.
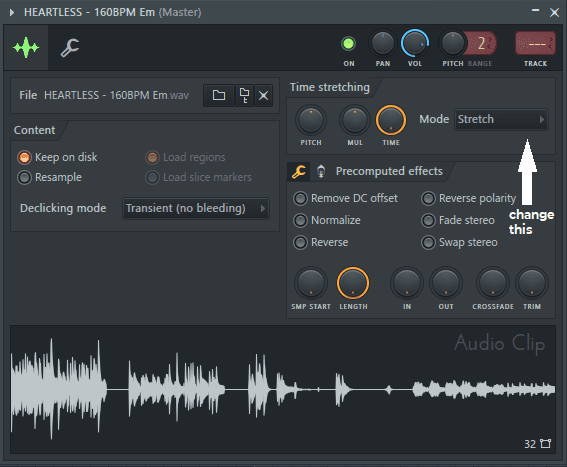
Then, you’ll be able to freely change the project’s BPM and the loop will stay in sync.
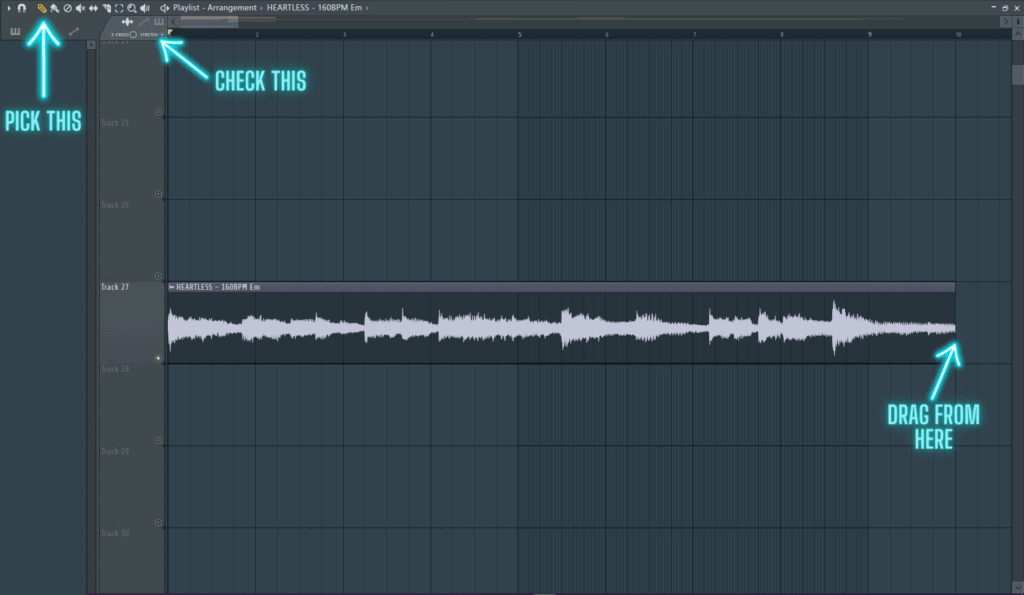
Method #2: Use the stretch tool (Not Recommended) – The stretch tool allows you to manually stretch audio clips as you desire according to the time grid.
Therefore, to match the BPM of an audio clip correctly, you’ll need to identify at least one place in the audio clip that you know how to assign to the time grid.
The easiest spot to identify is usually the end of the loop. The place where the loop ends usually belongs to the beginning of either bar #5 or bar #9.
To use the stretch tool:
- Select the pencil tool.
- Check the “Stretch” radio button right under the toolbar.
- Drag the end/beginning of the audio clip to be where ever you want them.
Step #3: Make An Incredible Drum Pattern
In this stage, we want to create a repeatable drum pattern that we can use and duplicate across the whole beat.
Now, you might say – isn’t that going to be boring? And you’re right, if we just copy the drum pattern to be 2:30 minutes long, it will eventually get boring. That’s why we’ll do some variations in the arrangement stage that comes later.
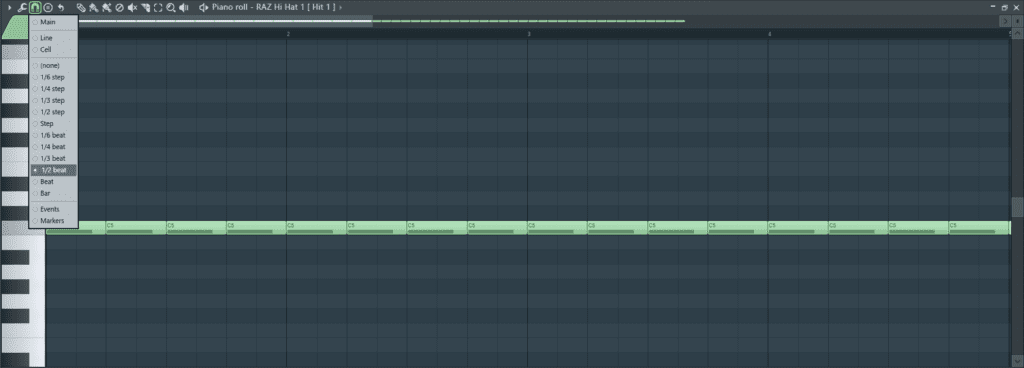
Sub-Step #1: Add A Basic Hihat Rhythm
I usually start my beats with a super simple hihat rhythm so it puts me in sync with the loop I’m using, and the BPM of the beat.
The two common ways to start are either one hihat per beat (time signature) or 1/2 a beat. See the image below:


To change your time grid so you can choose the rhythm click on the magnet icon that’s in the top-left toolbar, and pick your desired time signature.
Sub-Step #2: Place The Claps Correctly
The claps are usually placed at the beginning of the third beat of every bar. Take a look at the picture below to understand:

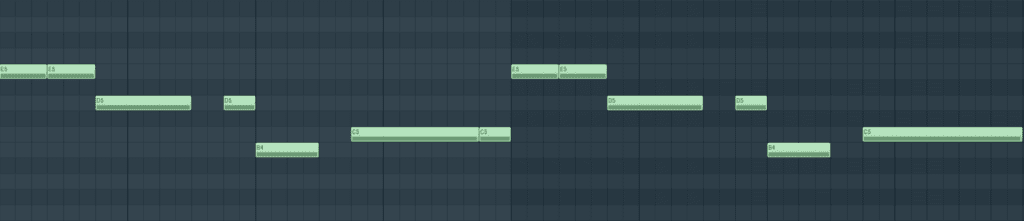
Sub-Step #3: Add The 808s
Now we’ve come to the real deal. In this step, we want to close down the 808 completely – from start to finish.
The reason I like to do this first is that the 808 tells me a lot about how good the beat will be, and how good the loop I’m working with is.
To add the 808 rhythm think of your loop as a roller coaster. Most of the time it’s either going down or going up, however, there are certain moments when it’s at the top or bottom. These are the moments when you’ll want to add an 808 hit.

After you identified the peaks of your loop and placed the 808s there, try to add “space fillers” which are basically notes that should fill up the empty space you have between the basic notes.

Now, it’s time to match the notes of the 808 to the root notes of the loop. To do that, take all the 808 notes a few octaves higher until they sound like a pluck, and alter them until there is no dissonance.
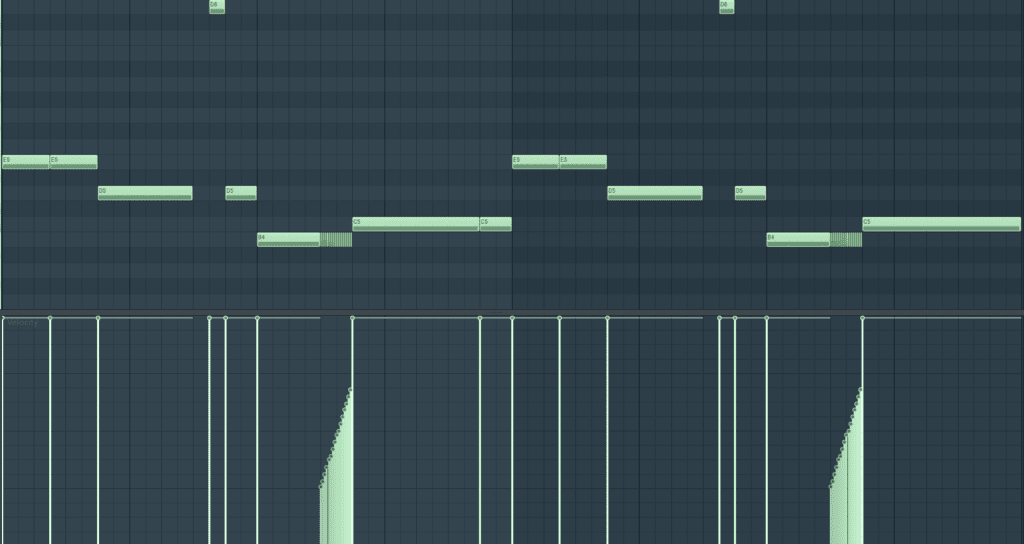
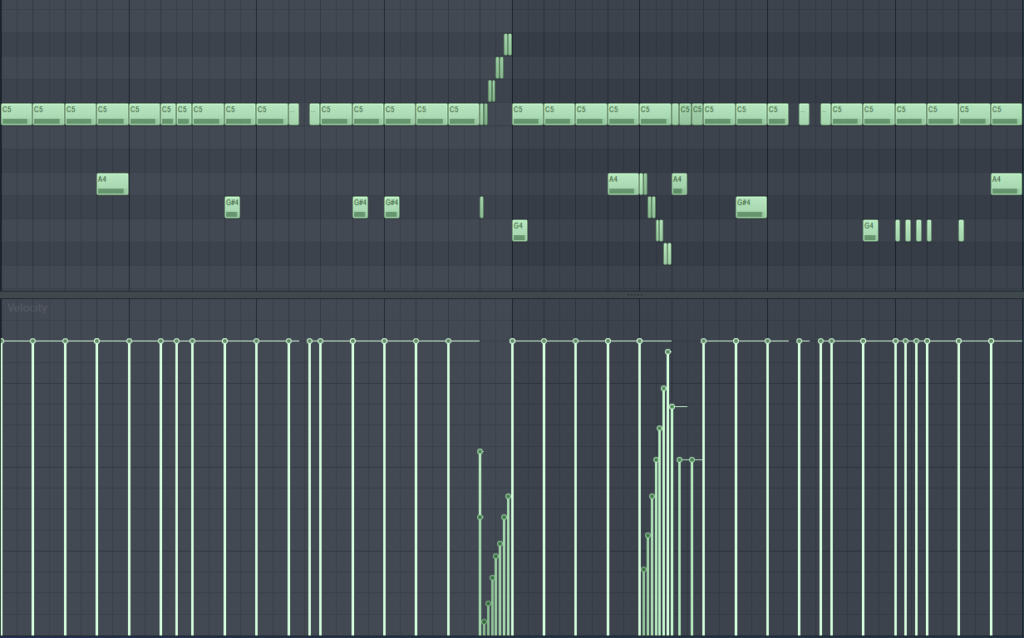
The final step is to add special fills and “ear candy” to make your 808s more interesting and improve the beat overall.
The two common types of fills are either “Octave Fills” or “808 Rolls”. “Octave Fills” are short notes that you play an octave higher, and “808 Rolls” lots of 808 notes that are played in a really short time – just like hi-hat rolls.
Bonus Tip: Make your 808 rolls increase in velocity from start to finish.
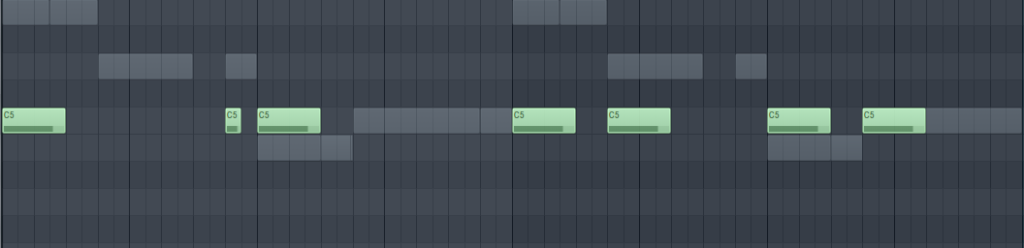
Sub-Step #4: Line Up A Kick With The 808s (Optional)
Lining up a kick with your 808 can make your drums hit a lot harder, and make your beat much more punchy. And, it’s extremely simple as well. Just make your kick follow your 808’s main rhythm and you’re set.
Notice that you should only copy the rhythm and not the notes. You want the kick to stay on a constant note which is usually the basic notes (C3 in FL Studio, and C5 in all other DAWs).
Also, you probably shouldn’t line up a kick on every 808 note since it’ll make your beat sound too complicated, and messy. I usually leave the 808 fills without a kick.

Sub-Step #5: Add Hihat Rolls & Fills
This part is one of the fun ones. Adding hihat rolls is what starts to get the beat going.
Hihat rolls are hihats that are played in a super-fast paste. Sounds simple right? Well, it is, but usually, you must know the general guidelines and practice doing it at least a few times before nailing a great hihat midi.
That’s why we’ve gone over the top to help you guys out.
We have created a free pack of 50 awesome hihat midis called the “SwitchUp Hihat Midis Pack” for you to use. Get this free pack here.
If you want to learn how to make hihat midis yourself though, these are our tips for you:
Tip #1: Place your rolls before the Kick / 808 Hits/ Clap
Generally, you want to place your hihat rolls before a major hit in the beat like a clap or a kick/ major 808 hit.
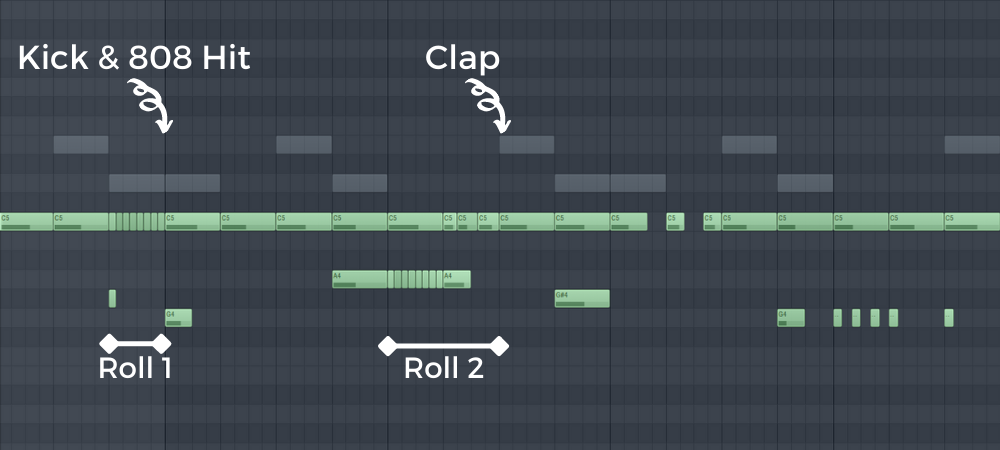
Tip #2: Make velocity fades across rolls
This will create more interest and will provide some ear candy to your hihats.
Tip #3: Change the notes of your hihats as a way to create interest
You can pitch a whole section up/down at once, you can gradually pitch them up or you can occasionally add notes at a different pitch like in the image below.
Sub-Step #6: Add Snares & Percussion
Snares and percussion are supposed to be “space fillers” in the beat. Usually, people use them to create some sort of extra interest and ear candy and keep the groove going.
Generally, there are no rules or guidelines when it comes to snares & percussion, however, there are some really helpful tips that I can give that’ll get you started.
First of all, slower beats usually have more snares & percussion since there are usually fewer hihats and there is more space to fill.
Second, most people tend to place the snares on the second part of the steps.


Sub-Step #7: Add Open Hats
When it comes to open hats, there are two main methods. I like to line up the open hats with major 808 hits so it gives it more power, however, some people like to put it just before major 808 and clap hits, so it does some preparation for them.
Sub-Step #8: Add FX & Transitions
Adding FX & Transitions is what makes your beat go from a “nice” beat to something that can be used in a hit song that has millions of streams.
I usually like to add transitions when the beat first comes in, and when a special section comes in. For example, before a section where I filter the loop.
A thing I learned with time though is that you should be really cautious when adding FX and transitions since it’s extremely easy to add to many of them and make your beat messy and unstable.
Notice that major songs usually have a maximum of two or three transitions, and two FX.
You can of course add more than two of both, just make sure that they’re not super noticeable, and that they don’t make your beat too messy.

Step #4: Mix Your Beats By Leveling, Panning, and Soft-Clipping
Ok! So we now have our awesome instrumental loop and drum pattern lined up together! Now it’s time to make sure that they sound as best as they possibly can on every device that we play them on.
Now, when it comes to mixing, there is some convention amongst professional mixing engineers about the way things should be done.
They’ll tell you that you have to use things like sidechain compression, gain stage everything to about -6dB so there’s enough headroom for the limiter, etc… All of that is great and is correct for the vast majority of genres. However, for trap & hip hop it just isn’t the case.
There’s a unique method that some “professional” mixing engineers may consider as “amateur”, but actually works a lot better than all other methods by far, and is a lot easier.
For all the fellow mixing engineers out there, don’t take this as an offense, Trap & Hip Hop beats just have a really unique sound that requires a unique approach to achieve.
So, after we’ve discussed all the background information, let’s go down to business. Here are the 5 steps that I use in order to mix my beats:
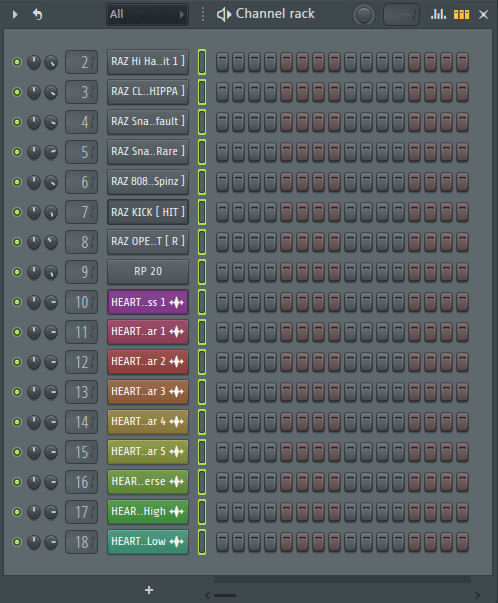
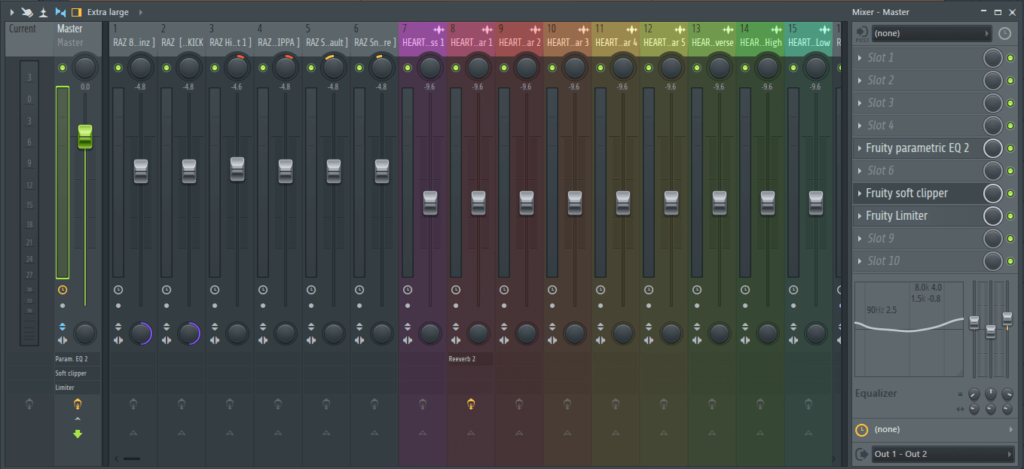
Step #1: Assign Everything To A Mixer Channel
In order to level your instruments easily, apply effects such as EQ, reverb, compression, etc.. and start the mixing process in general, you’d need to assign the channel to a mixer channel.
This way, you’ll be able to level everything easily and have full control over each channel.
To assign something to a mixer channel in FL Studio, open its settings from the channel rack, click the little arrow at the top left corner, and then click “assign free mixer track”.
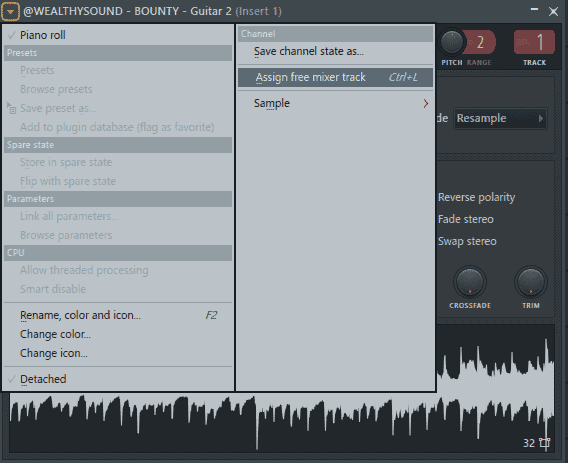
Another option would be to alter the number that appears next to the channel in the channel rack, or select all channels by holding your mouse down and hovering over all of them, and then clicking (CTRL+L: Windows / COMMAND + L: Mac):
Step #2: Level Everything In The Mixer According To The Kick & 808
After you’ve linked every track to the mixer, you may go and start leveling each one of the mixer channels, so everything sounds balanced, and each channel has its place.
While there are many ways of leveling a mix, and there’s no right or wrong as long as there’s no unwanted clipping involved, this way is the best for keeping you safe from clipping and achieving a well-balanced mix.
I usually like leveling with a bottom-top method. Meaning that I start from the base parts (kick, 808, drums, etc..), then I go to the mid parts (chords, pads, etc..), and then I level the top elements (vocals, leads, etc..).
However, if you’re using a melodic loop (as I think you should), then, you’ll just need to level the drums and the loop as a whole next.
But, you should level your tracks in whatever way you want to. As long as you don’t change the kick’s volume, it’s alright.
Step #1: Set the kick’s gain to 100% (-0dB)
This step will give you a great leveling starting point to count on since it’ll make sure that nothing is louder than the kick and keep it punchy.
Some people might say that this is bad since it’ll lead to something called “clipping” which is when something is louder than -0dB.
However, in Trap & Hip Hop, we can actually really use this to our favor and “fix it” with something a plugin called “soft clipper” later.
Step #2: Level the 808s
Since the hardest and most important part of mixing is usually making the kick & 808 hit right, it’s best if you start from it. If you get them balanced correctly, it will give you a much clearer image of the mix and prepare its base parts.
To make sure that they hit right, start from a 100% gain (-0dB), and then level it down until you hear that they’re balanced.
This is how they’re supposed to sound together:
Step #3: Level all the other drums
To level, a drum that’s not the kick/808 correctly, start from a level where I can’t hear it and level it up slowly until it’s in place.
I usually like to work in this order:
- clap
- hihats
- snares
- percussion
- FX & Transitions
Step #4: Level all the melodic instruments (your loop)
If you use a pre-made loop, you usually won’t need to level each channel separately. You’d rather level all the channels together.
What I usually do is start from a level where I can’t hear it and level it up slowly until it’s in place.
Step #3: Pan The Drums Correctly
Panning your drums and using the stereo field properly can take your beat from sounding ok to sounding professional and amazingly mixed.
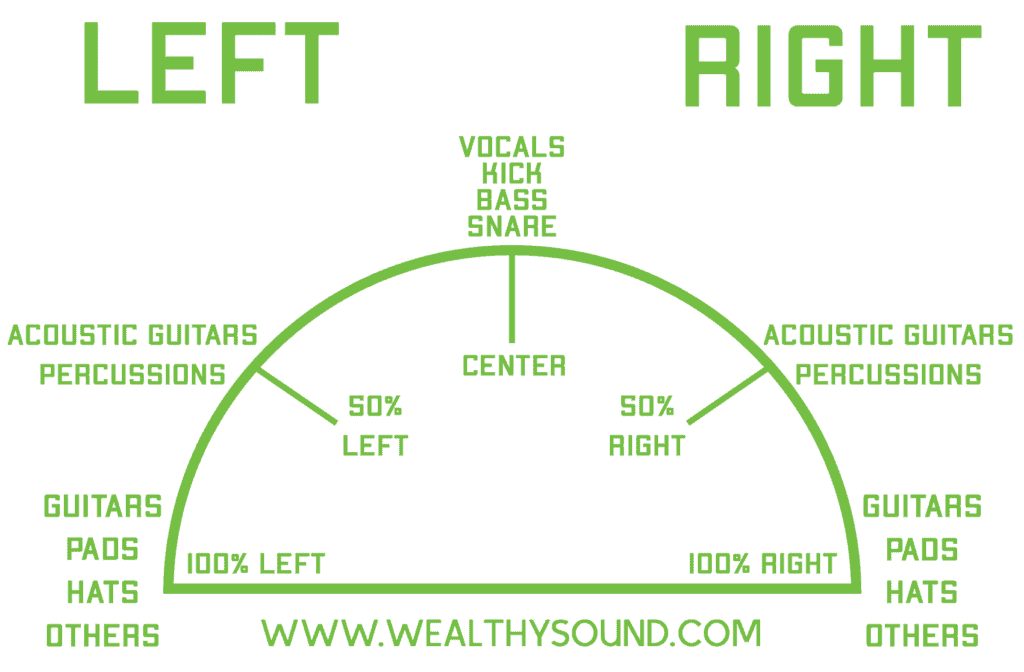
So, let’s look at each of the drums and see how they should be panned.
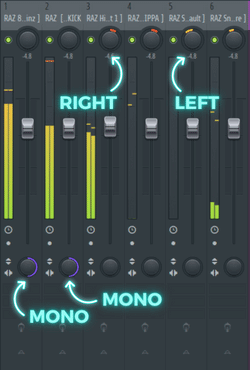
Kick & 808 – Mono
Traditionally, the kick & 808 shouldn’t be panned or have any width at all since they contain mainly low frequencies.
Low frequencies aren’t directional, so we can’t really understand the direction they’re coming from. Therefore, there is no point in panning them or making them stereo.
Moreover, when you make something wider, you push it more towards the back of the mix instead of the front.
And usually, you want the kick & 808 to be centered and upfront.
Claps – Stereo
Usually, claps tend to be stereo. Stereo simulates the sound of space. Therefore, claps sound better in stereo.
In other genres, there might be reasons to make your clap mono, but in Trap & Hip Hop, the claps are almost always stereo.
Snares/Percussion – Panned/Stereo
Usually, snares should be sort of in the sides of the mix.
They shouldn’t be too noticeable, but they also shouldn’t be far in the back of the mix.
Now, you might be asking yourself – How can I get this balance? Keep the panning between 15%-60%.
Step #5: Master your beats using an EQ, a SoftClipper, and a Limiter
Mastering your beats is actually an extremely simple process that only takes 3 quick steps.
Step #1: Equalize The Master Track
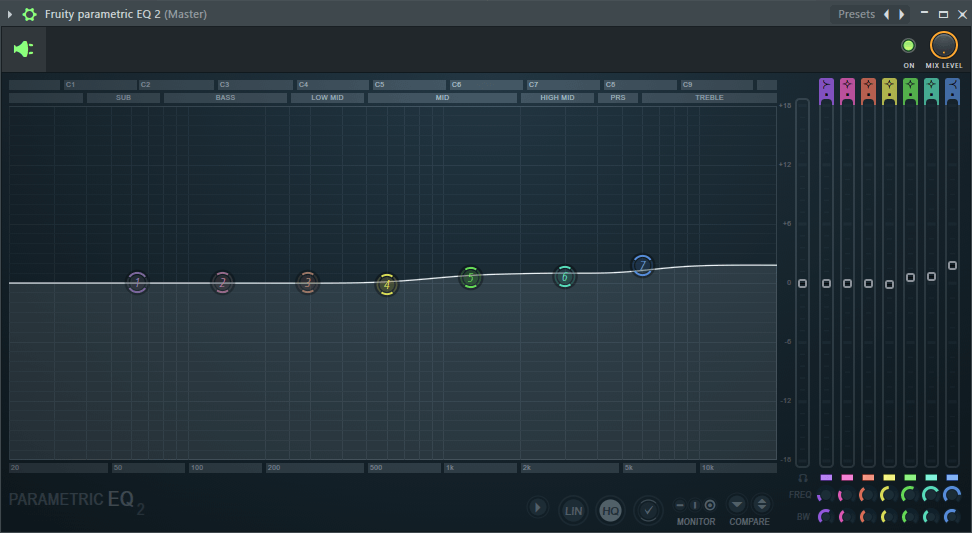
This step is all about balancing and controlling the tone of the beat across the frequency spectrum.
It’s just giving a little extra push that makes sure that it doesn’t lack any frequencies, and that no frequencies are harsh or too loud.
When it comes to beats, there truly aren’t any rules. You should just listen to your beat and try to determine which of the three areas (Bass, Mid, High-End) need to be treated (maybe none of them should).
I usually find it helpful to give a slight boost to the high-end so everything is a little crisper and brighter.
Step #2: Add A Soft Clipper For Extra Punch
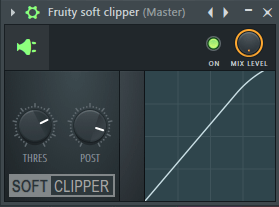
The soft clipper will make your beat have that satisfying sound of crunchiness and boominess.
Here are the parameters you should know (taken from Image-Line’s website):
- Threshold (THRES) – The volume threshold above which Soft Clipper will compress the audio signal.
- Post Gain (POST) – Volume level applied after the compression.
- Output Meter – Displays the output volume levels of the plugin.
- Levels display – Displays the compression settings (hold your cursor over the display to see input to output levels mapping in the hint bar). Drag the cursor in the display to change the compression threshold.
I usually like to set the threshold to -6.1 dB, and the post gain to 85% as a starting point, and then fine-tune from there.
Step #3: Add A Limiter To Avoid Clipping
This is the absolute final step that you have to take before sending out your beats and starting to market and sell them!
It will make sure that you avoid something called “clipping”, so the streaming platforms you upload your beats to won’t “penalize” your beats, and lower ruin their balance in order to try and “fix” that.
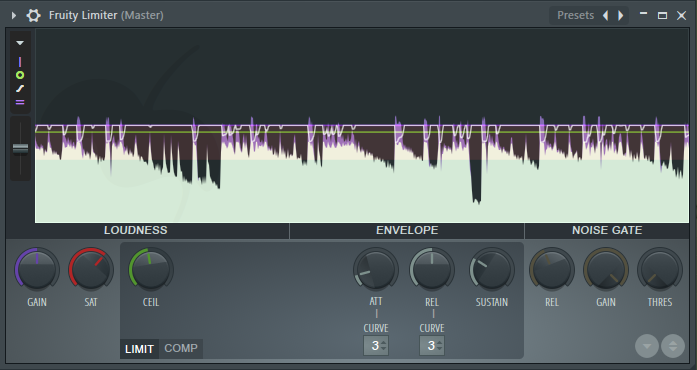
So, here are the parameters you should know (taken from Image-Line’s website):
- GAIN (Purple) – Limiter input gain. NOTE: this gain is post-Compressor and pre-Limiter.
- SAT (Saturation) – Controls the threshold level, signals reaching into the red region will be saturated. To lower the threshold, and so increase the saturation turn SAT left. Set by ear.
- CEIL (Ceiling) – Limiter ceiling. Sets the level above which the signal will be limited. While it is not possible to disable the limiter stage completely, setting the ceiling level to the maximum (+12 dB) should effectively prevent limiter engaging.
I usually like to keep the gain at 0dB, the SAT at -5.5dB, and the CEIL at -1dB as a starting point and then fine-tune from there until the peak of the beat is at maximum 0dB.
Alright! Now that we know what’s the complete process of making hit-level beats, we have one last important thing we need to discuss. Which is – what equipment to use.
What Equipment & Software You Need To Make Beats
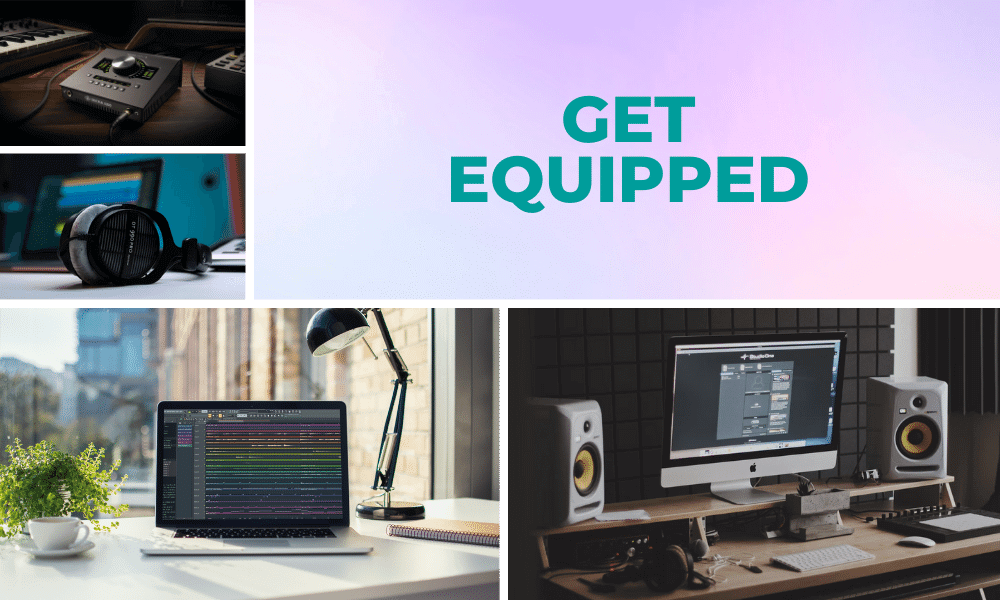
The first step for us to be making beats is to get all the necessary pieces of equipment.
Usually, when people hear that they need to get music equipment, they think of really big quality speakers and a whole bunch of acoustic foam panels. However, those two pieces of equipment are actually not necessary at all for you to succeed in the music industry.
What you’ll actually need can narrow down to just a computer and a DAW (Digital Audio Workstation). Sounds crazy right? Well, that’s the truth. All you need to start making hit-level beats is just a computer and a piece of software.
When you start taking things seriously I would suggest getting a few more things, so you can maximize your workflow efficiency, and your sound quality. However, it’s absolutely not necessary for now.
In the following sections, I’ll show all the 5 pieces of equipment that you should (and shouldn’t) consider getting to make quality music.
Equipment Piece #1: Get A Laptop/Computer (Necessary)
A laptop or a computer is a necessary piece of equipment to get to make beats. This is what runs all the software, saves all the samples, and does everything necessary for you to make music.
So, if a laptop is so important to make music, which one should I get?
Generally, most music producers and beatmakers today use Macintosh / IOS computers since it has become a bit of a standard thing among the community.
The original cause for that was that audio companies support Macintosh & IOS better than they support Windows.
The Mac operating systems are just a lot more optimized for audio and music production than Windows.
Therefore, I would recommend anyone who wants to get serious with making beats to get a Macintosh / IOS computer.
So, Mac computers are great. But, they are really expensive. What can you buy if you’re on a budget?
If you’re on a budget I would recommend Asus, Razer, or Dell computers.
Equipment Piece #2: Get A DAW (Necessary)
Besides your computer, your DAW (Digital Audio Workspace) is the most important piece of equipment that allows you to make music.
It allows you to record audio, make drum patterns, add real instruments like pianos and guitars and digital synthesizers to make more electronic sounds. Basically to do absolutely anything you’d like.
The most popular and convenient DAW for making beats by far is FL Studio by Image-Line. It is super intuitive, easy to understand, and has more than enough capabilities for you to use.
It has a super convenient midi editor called the “Piano Roll”, which is perfect for making drum patterns and melodies. The following video explains how to use it, and gives some helpful workflow tips for you to use.
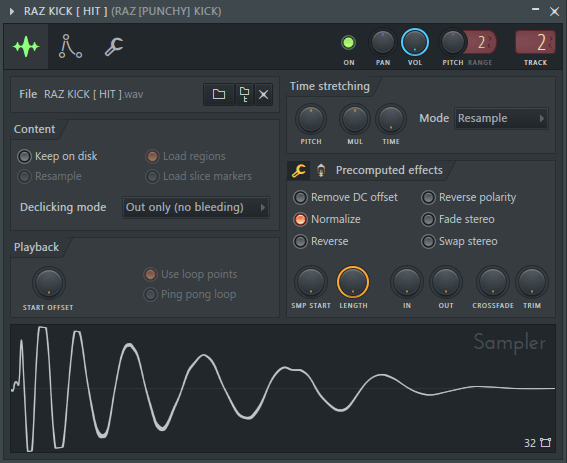
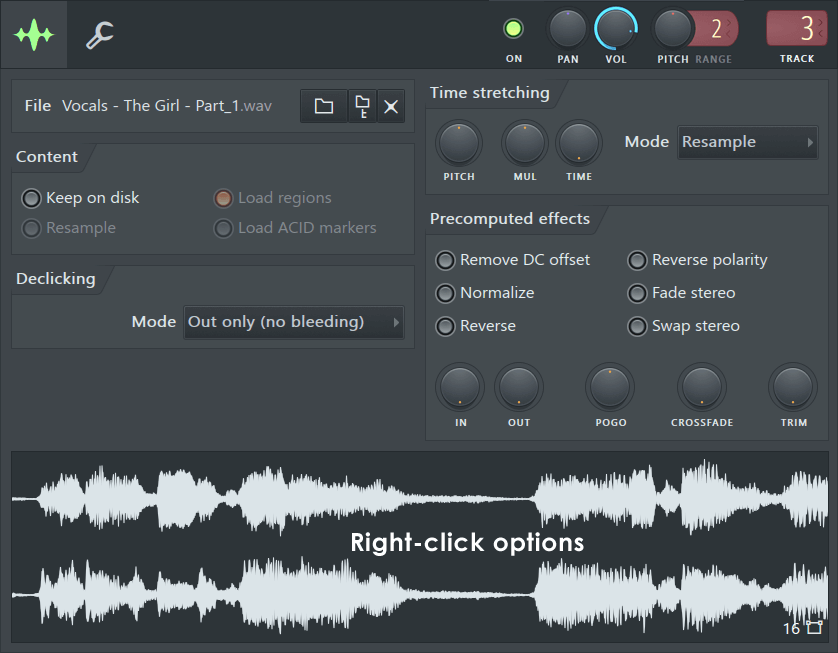
And an audio sampler that allows you to edit audio files easily and do pitch & time editing, gain manipulation, reverse, normalize, fade in & out, and do a whole list of other things in a matter of seconds.
Moreover, it is relatively cheap – you can get it from 99$ for a lifetime.

You can also get a free trial for an unlimited time from this link.
Equipment Piece #3: Get Studio Headphones (Optional)
Studio headphones will help you hear everything as accurately as possible without any modifications, boosts, or cuts so you can make your beats sound perfect on any device you play it on.
Therefore, when you decide to take music production seriously, I suggest that you get yourself a pair of quality studio headphones.
The best ones I have used up until now are the DT 770 / 990 Pro of Beyerdynamic. Their sound quality is extremely good, they’re really comfortable, and you can get them for a pretty cheap price.
Here’s a detailed review of the best studio headphones:
IMPORTANT DISCLAIMER: If you do decide to get professional headphones, you really should also get a quality external audio interface. Otherwise, you probably won’t be able to take advantage of the quality of them.
Equipment Piece #4: Get Studio Monitors (Optional)
Studio monitors are the thing that most music producers and mixing engineers seem to rush to buy first, however, I’d probably recommend you to wait and put your money on quality studio headphones for now.
You’ll only be able to take advantage of the quality of studio monitors when you put them in an acoustically treated room. Early reflections and frequency cancellations can completely ruin your sound quality.
Therefore, I would recommend that you get a pair of quality studio headphones now, and wait until you get early success to get an acoustically treated room where you can use quality speakers.
However, if you still want to get a pair of studio monitors now, here’s a detailed review of the best ones to buy:
Equipment Piece #5: Get An Audio Interface (Optional)
The first thing I’d recommend you to buy when trying to improve your sound quality is a good external audio interface.
An audio interface is what converts the digital audio that’s in your computer to the sound waves that come out of your headphones or speakers. It’s also what allows you to record audio sources from real life like vocals or guitars.
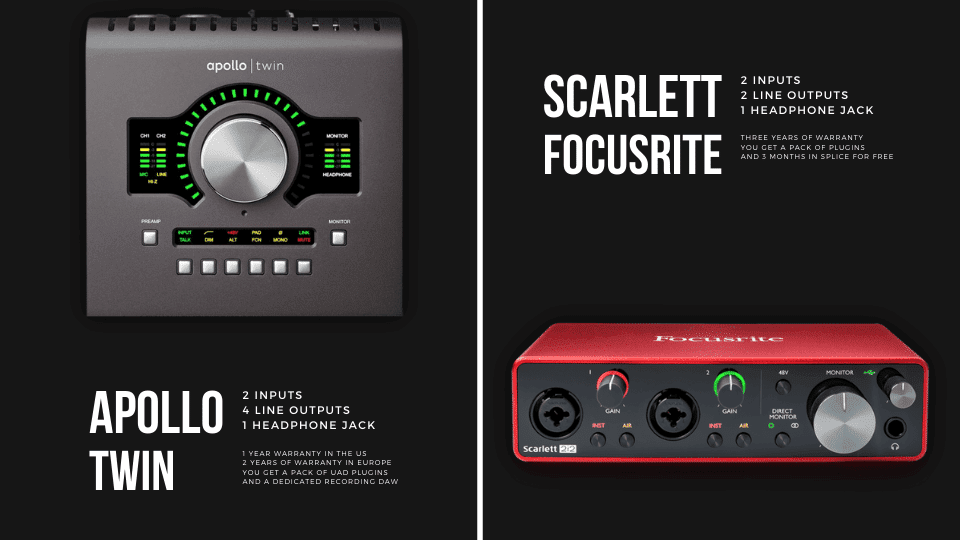
I have tried a lot of audio interfaces over the years, and by far the best ones I’ve stumbled upon are Apollo Twin Duo by Universal audio, and Scarlett 2i2 by Focusrite.
Both are high quality, easy to use, and have become industry standards.
The Scarlett interface is recommended for those of you who are on a budget, and the Apollo Twin interface is recommended for those of you who are willing to invest a little more into your sound quality.
However, I would only recommend getting the Apollo Twin if you’re using a Mac computer since using the Apollo Twin on Windows comes with all sorts of issues that can even make it unusable sometimes.
Here’s a detailed review of both these audio interfaces: