If you think that your mix sounds dull, or empty, and you want it to sound warmer and more exciting, you probably should add saturation.
Saturation is one of the most powerful mixing tools, so it can make a big difference when it comes to mixing and mastering.
Obviously, it can not replace proper mixing, but if you add saturation to a well-mixed track, it will take it to the next level.
In this guide, I’ll show you how to use saturation correctly, so you can make your mixes come alive.
But first, for those of you who don’t know
What Is Saturation?
Saturation is an audio effect that adds harmonic frequencies and applies soft-knee compression. It usually occurs when an audio signal crosses the 0dB gain limit, but It is widely used today both as a creative effect and to fix a lack of certain frequency groups (mostly high frequencies).
How can saturation help you?
Saturation can help you whenever you want to add new frequencies to a sound. (In contrast to an equalizer that can only boost or lower existing frequencies).
Let’s see what happens when we add saturation to a single frequency generator.
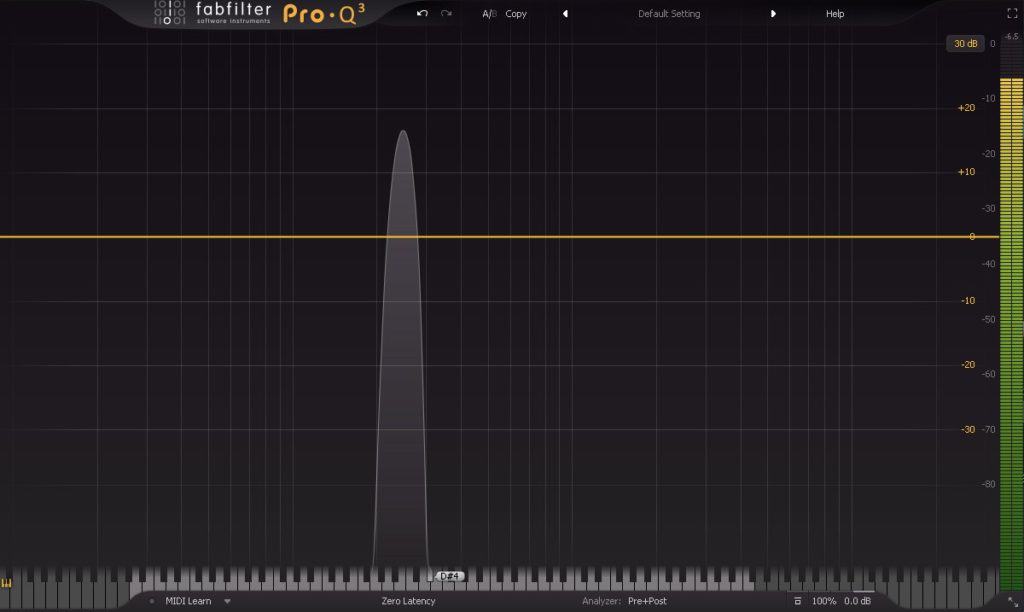
Now lets add saturation.
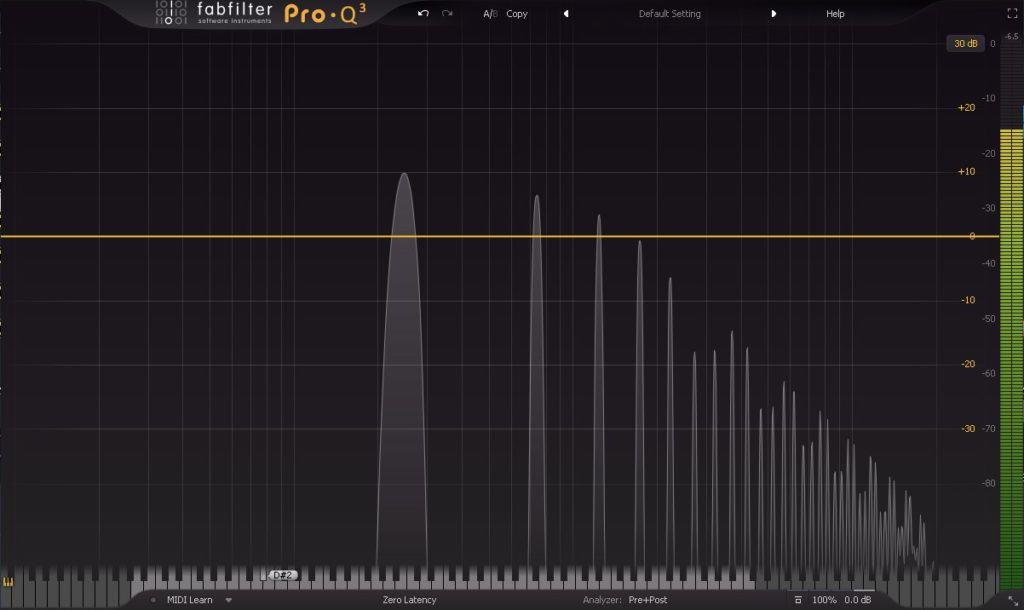
As you can see, the saturation added a bunch of new harmonic frequencies that make the sound richer.
For example, it can really help with thin vocals by adding more mid-range and low harmonic frequencies to it.
The origins of saturation
Originally, saturation referred to the sound heard when an audio signal went through an analog recording device that was driven too loud.

When this happened, a distortion effect was created. But it didn’t sound like the horrible effect of the digital distortion that occurs today when sound is clipping.
When it happened those days, the saturation added harmonic frequencies, that made the recording sound warm and full.
Today, digital plugins are only simulating the sound of the original effect of analog devices.
Different Kinds Of Saturation Plugins
Tape saturation plugins
Tape saturation plugins are simulating the sound of an audio signal going through an analog tape machine.
These plugins are adding a variety of harmonic frequencies, compressing the sound, boosting the low frequencies, and they tend to soften the sound.
Many think of tape saturation plugin as sounding warm and fat. Therefore they are great for filling up your mixes and adding depth and dimension.
Tube saturation plugins
Tube saturation plugins are simulating the sound of analog tube pre-amplifiers.
These plugins are also adding harmonic frequencies, and compressing the sound. But, when pushed too far, they tend to have an aggressive feeling, so be careful.
These plugins add 2nd order harmonics, which are basically higher and lower octaves of the sound.
Therefore, they usually sound more profound and deep than tape saturation plugins.
This type of saturation is my favorite, and it’s considered to be the best type of saturation there is.
Transistor Saturation
Transistor saturation plugins are simulating the sound of transistors-based circuits.
These plugins add a bit of hard-clipping compression, and odd-order harmonics, which are basically third and fifth harmonics.
Therefore, they usually sound add a unique textured tone. However, if they’re subtle enough, they sound smooth and pleasant.
When Should You Use Saturation
Basically, you should use saturation whenever you think that a certain element is lacking some frequencies.
Instruments That Usually Need Saturation
- Vocals – Adding saturation to your vocals can have an incredibly powerful effect.
Especially on thin or too-dark vocals.
By adding saturation to thin vocals, you can add low and mid-range harmonic frequencies that make them sound full and deep.
And by adding saturation to dark and obscure vocals, you can add high harmonic frequencies that make your vocals present. - Guitars – Adding saturation to your guitars can be amazing when the guitar sounds body-less, or obscure.
Usually, if the guitar is too dark, you’d want to saturate (3kHz – 20kHz), and if the guitar is too weak, you’d want to saturate (500Hz – 5kHz).
Whether it’s an acoustic guitar or an electric guitar doesn’t matter (unless you want to add distortion). - Drums – Adding saturation to your drums can help in several different ways to each drum.
But, mainly, adding saturation to your drums can make them more powerful if you saturate (200Hz – 2kHz), punchier if you saturate (4kHz – 10kHz), and more exciting if you saturate (8kHz – 20kHz).
A great thing to try is saturating and over-driving the reverb of your drums. It gives the drums a thick, powerful feeling. - Synths – Adding saturation to your synths can help with making them more powerful by adding harmonic mid and high frequencies.
When I saturate synths, I usually saturate the mid-range frequencies (500Hz – 4kHz), and sometimes I apply a slight saturation to the presence frequencies (4kHz – 6kHz). - Basses – Adding saturation to your bass can tremendously help with filling it up and making it a whole lot more powerful.
By adding the right harmonic frequencies, you can totally transfer your basses from sounding weak to astounding.
I usually saturate (500Hz-2kHz) to fill it up, and (4kHz – 8kHz) to make it more aggressive. - Effects – Adding saturation to your effects can make them sound vintage (by distorting them), or it can just make them sound fatter.
Either way, it’s always recommended to try it out.
Usually, the best area to saturate effects is in its dominant frequencies area.
For example, when I saturate a reverse-vocal effect, I mostly saturate the high-mid frequencies (2kHz – 4kHz) and the presence frequencies (4kHz – 6kHz).
Saturation On Your Master
Adding saturation to your master can be a game-changer. If you use it right, you can flip your song from sounding o.k to amazing.
Basically, applying saturation on your master is so powerful, because it’s actually adding harmonic frequencies to the final sound of all of your instruments as one.
This way, you can not only thicken up the sound, but you can also make it sound a bit more unified.
When saturating a mix with a multi-band saturation plugin (such as Fab-Filter Saturn), try to figure out what frequencies lack thickness the most, and saturate it.
For example, when I master an EDM track, I mostly saturate the bass, and if I think it can help, I also saturate the mids and the highs.
Listen to this example of my future bounce drop pre and post saturation –
Tips For Using Saturation
Use saturation to replace harsh frequencies – If you have ever tried to remove harsh frequencies from a track, you’ve probably figured that eliminating them is not the only thing you should do.
Even though harsh frequencies bother the listener a lot, they are an essential part of the sound.
So what should you do? Use saturation after you equalize to create new frequencies that will replace the previous harsh frequencies.
Listen to this demonstration to see this method in action –